100th Mini PC Install Milestone – Best Practices
- Home
- IT Consulting
- Technology Consulting
- 100th Mini PC Install Milestone – Best Practices
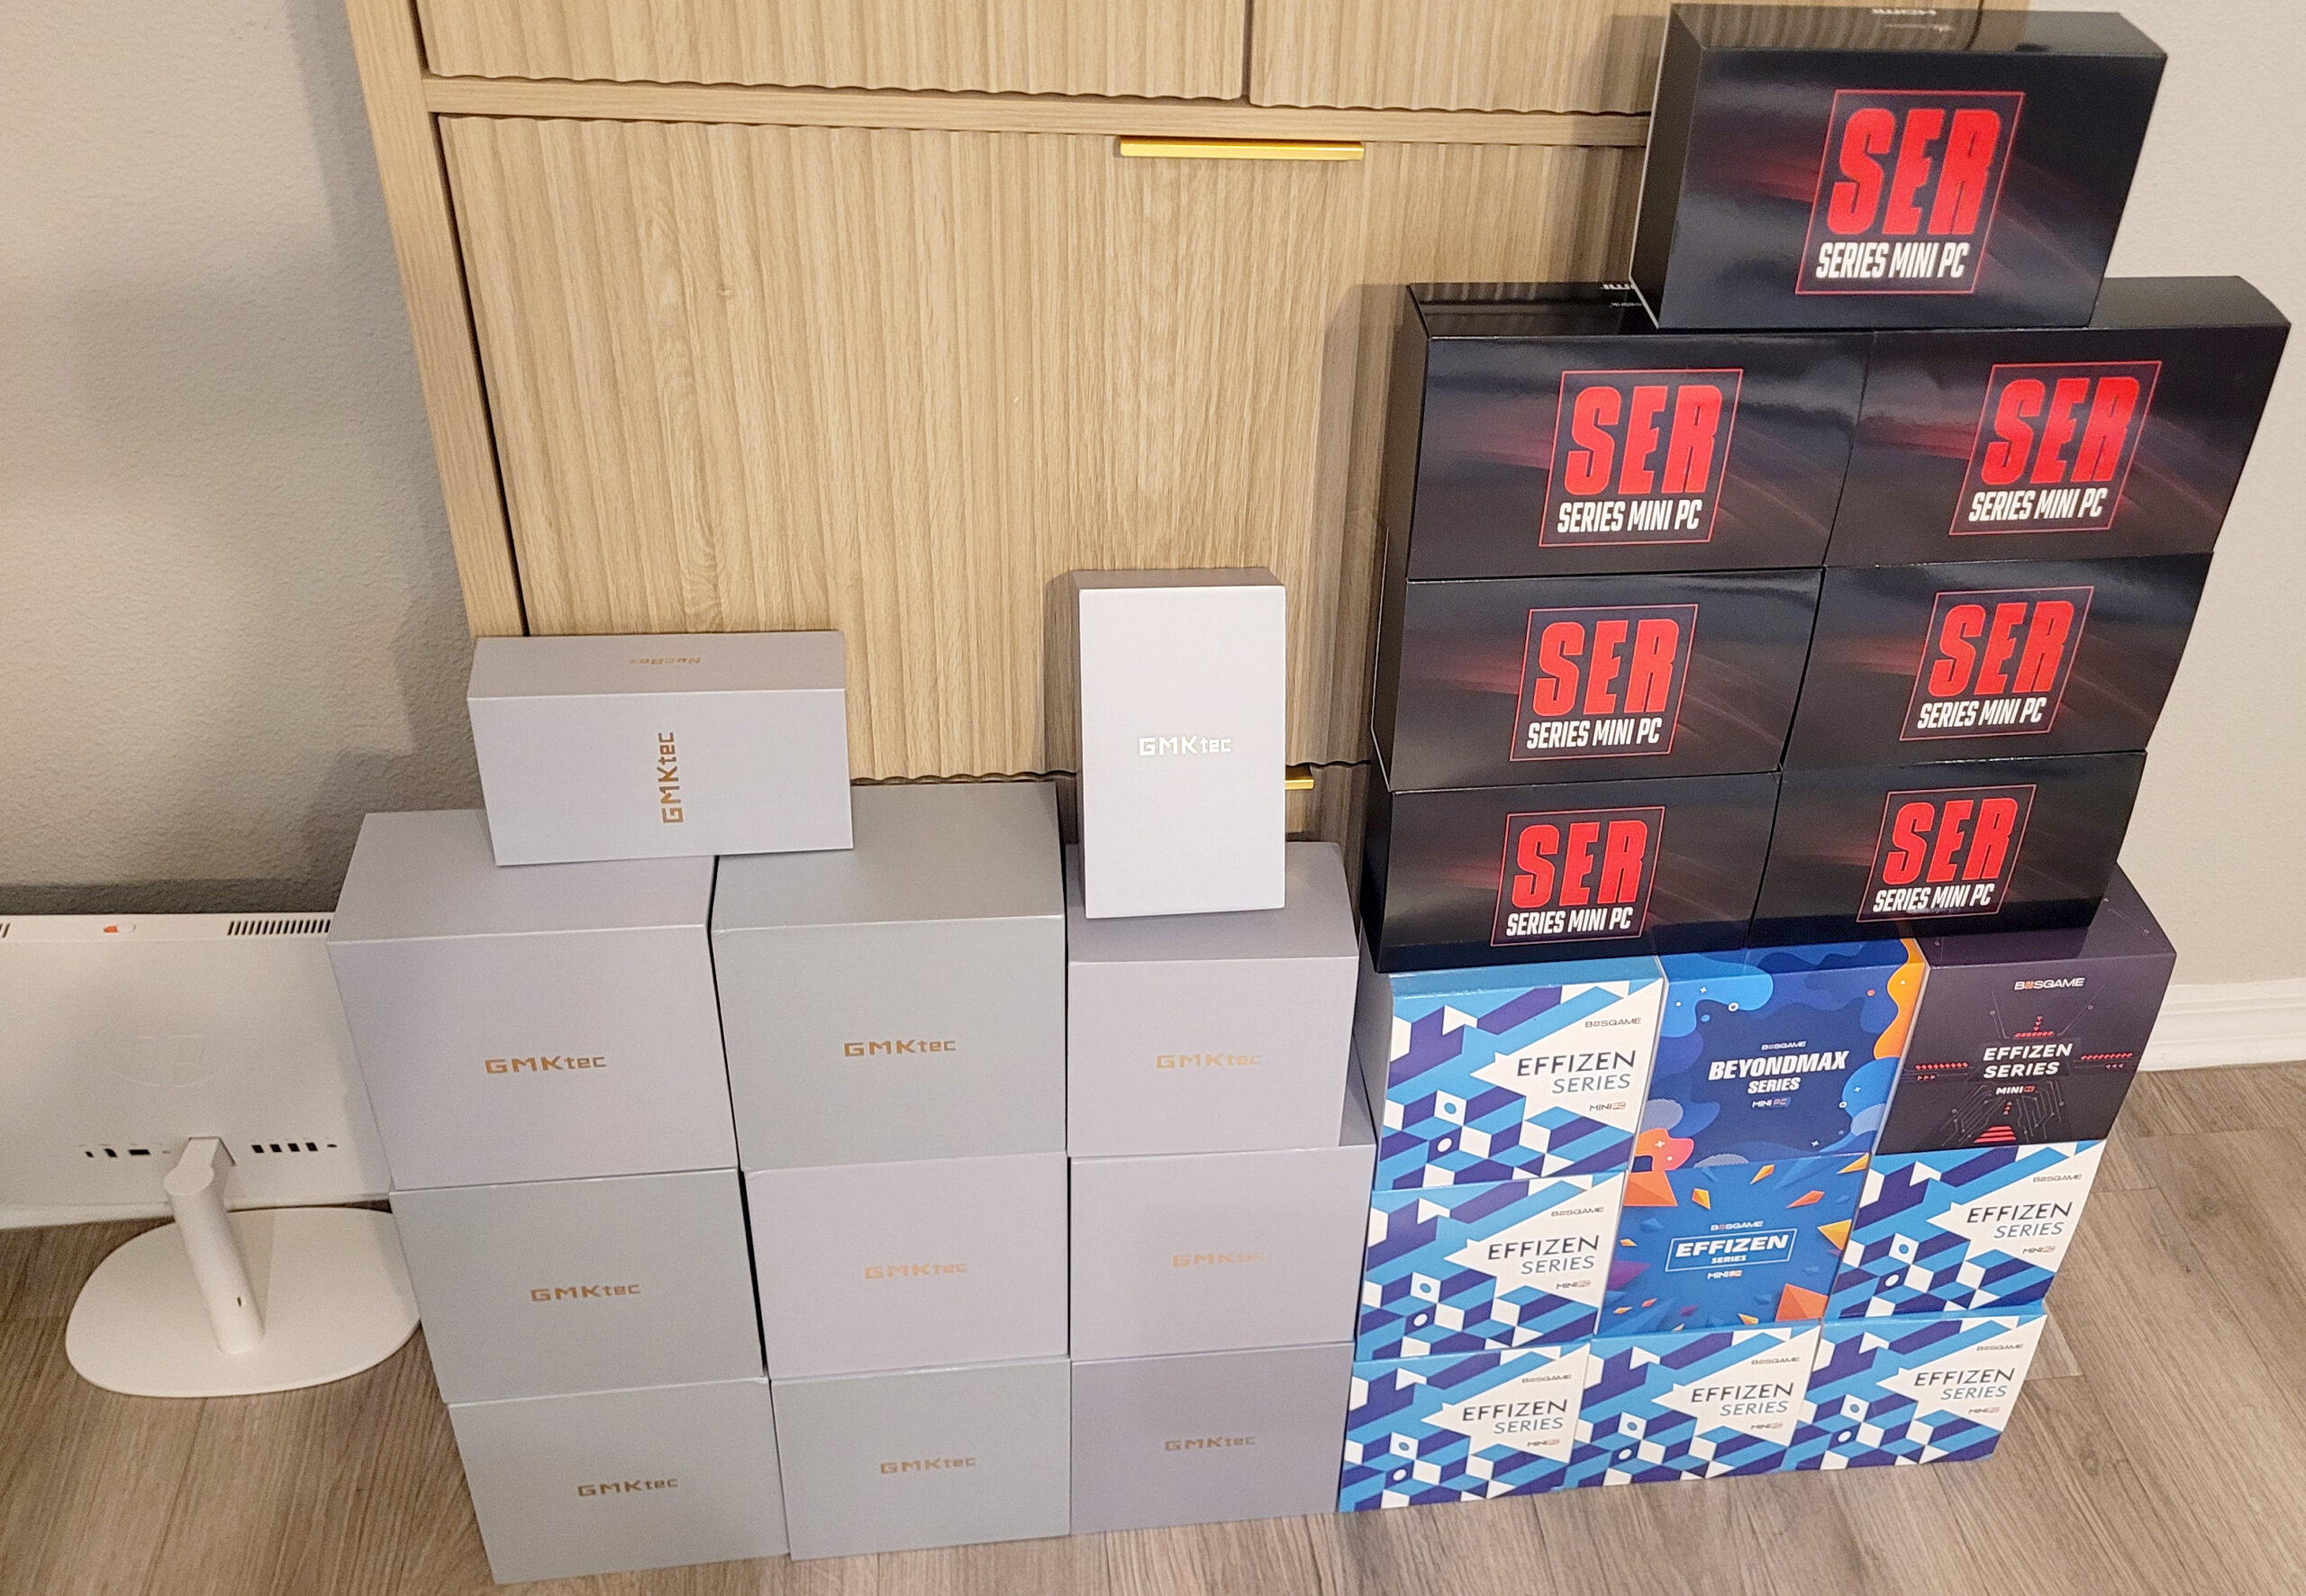
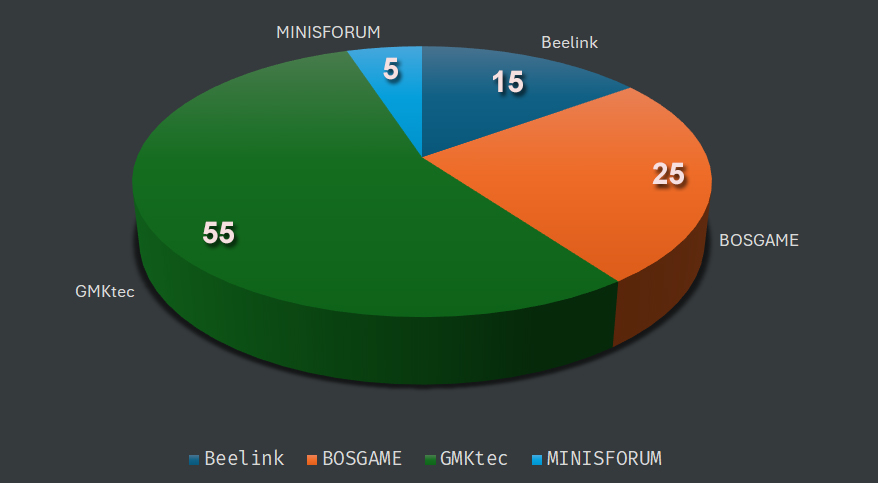
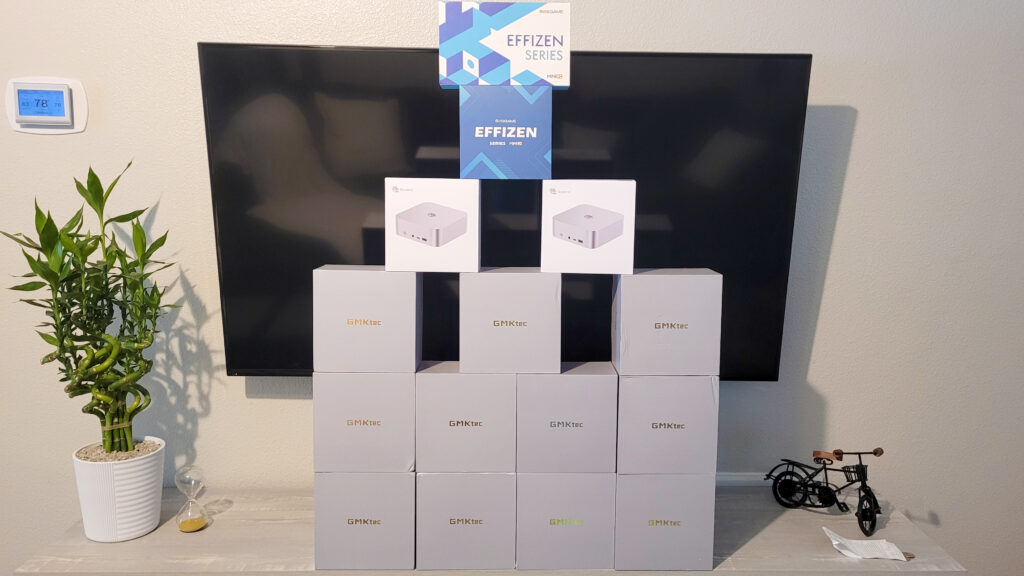
With the pressure of migrating out of Windows 10 due to the end of support, and also rising costs in Hardware due to inflation and other factors, such as a memory supply shortage, I had to seek options for myself and my clients in replacing hundreds of PCs with good performance and cost. I came across Mini PCs on Amazon and immediately joined some forums, including the subreddit r/MiniPC, to obtain as much information as possible. Certain brands were more popular than others, so as I started to replace computers I gave as many brands as possible a chance, completing the 100 installations with the following manufacturers: Beelink, BOSGAME, GMKtec and Minisforum. Here is a breakdown:
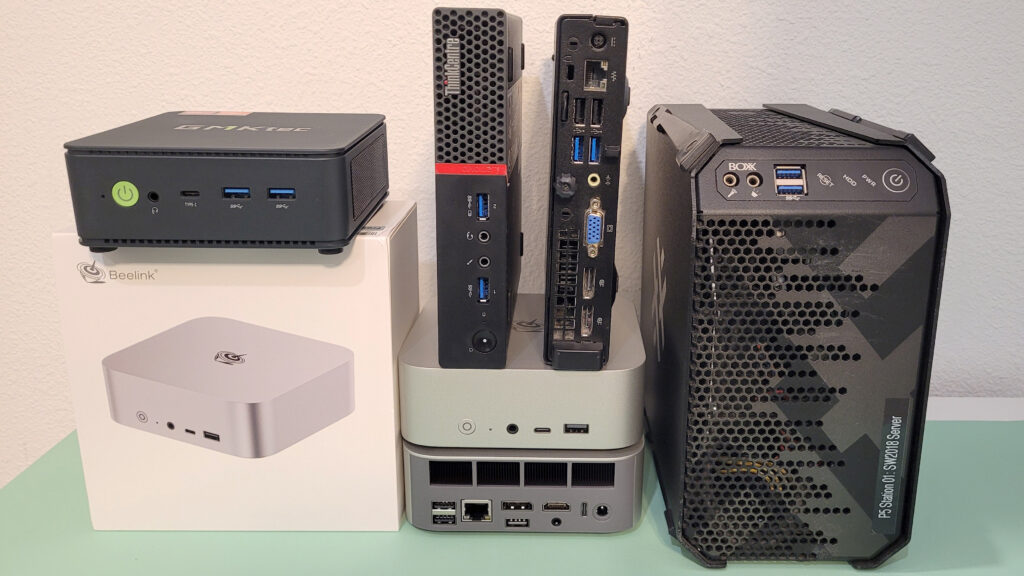
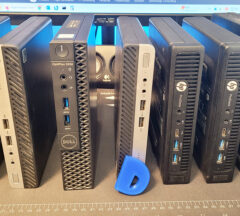
I have to mention that all of these installs were performed between 2024 and 2026. Before, I had worked with Mini PCs from Dell (Optiplex), HP (EliteDesk, ProDesk), BOXX (APEXX), Lenovo (ThinkCentre), Alfawise (z83), MSI (Wind PC), and Compaq (EVO). Let’s dive deep into the specifications of these Mini PCs.

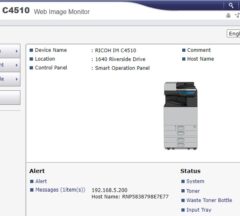
Energy Usage
I performed an in-depth study of every single Mini PC I could get my hands on and the results were published here: Energy usage research on Mini PCs, SFF, ITC and Micro Computers. Regardless of the processors, Intel or AMD, these PCs averaged 7-11 Watts when idle, using way less power than any desktop or laptop out there, but still packing a punch when it came to performance. The CPU models (Ex. Ryzen 9 Pro 8945HS, i9-1300HK, N97, N150, etc) as well as many details of the PCs are listed for every entry. To see benchmarks of these CPUs, I recommend passmark.
Components and Flexibility
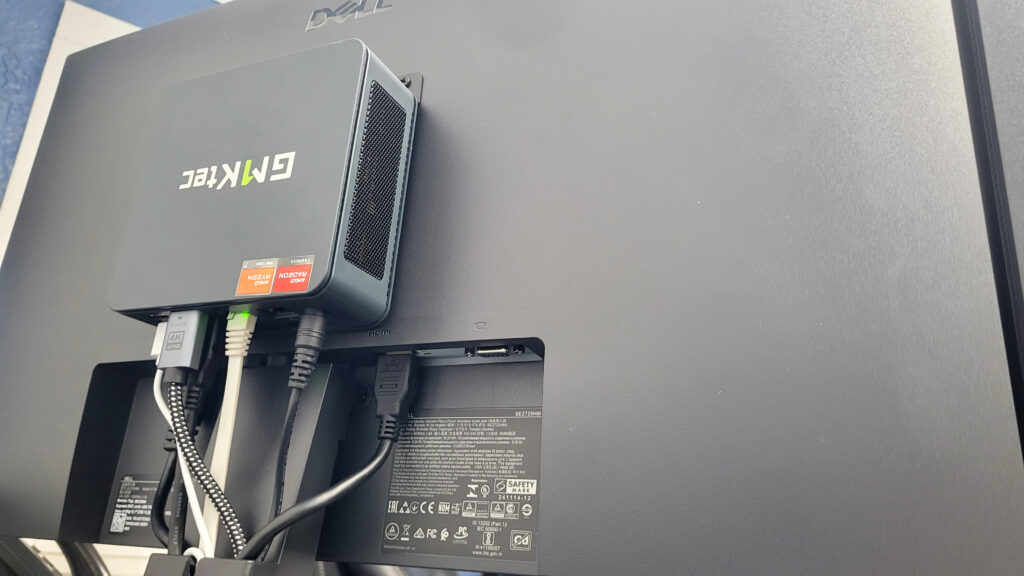
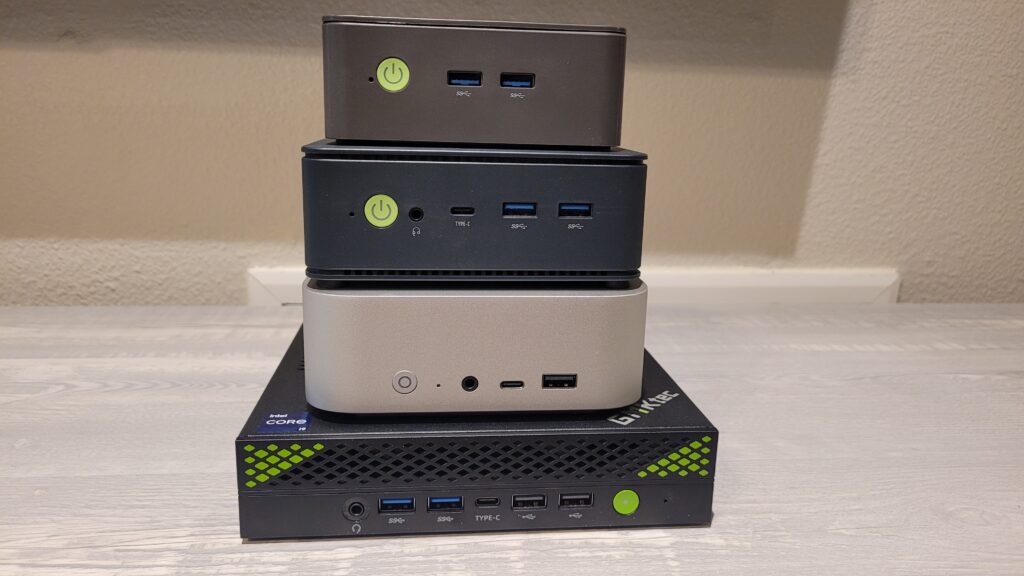
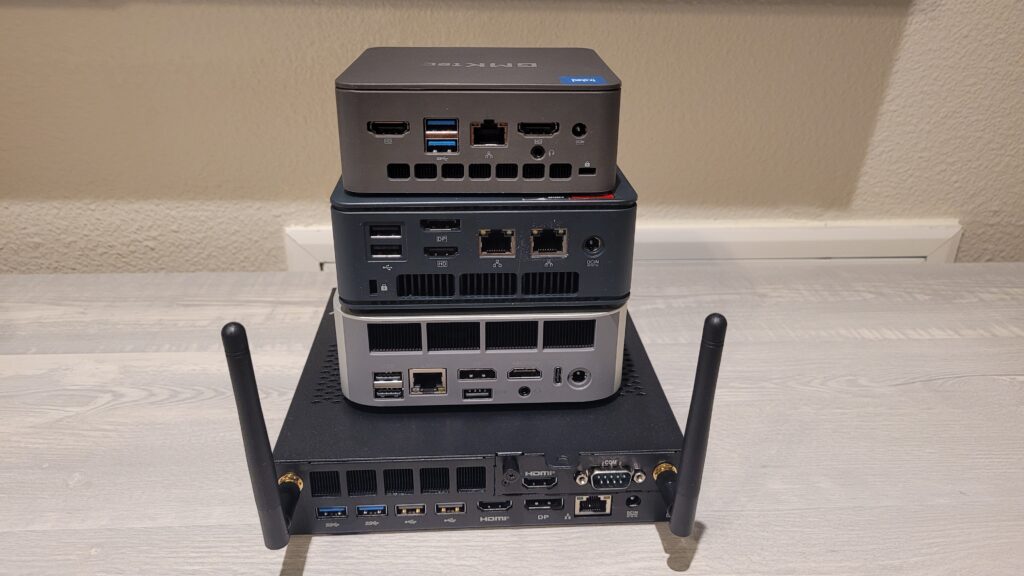
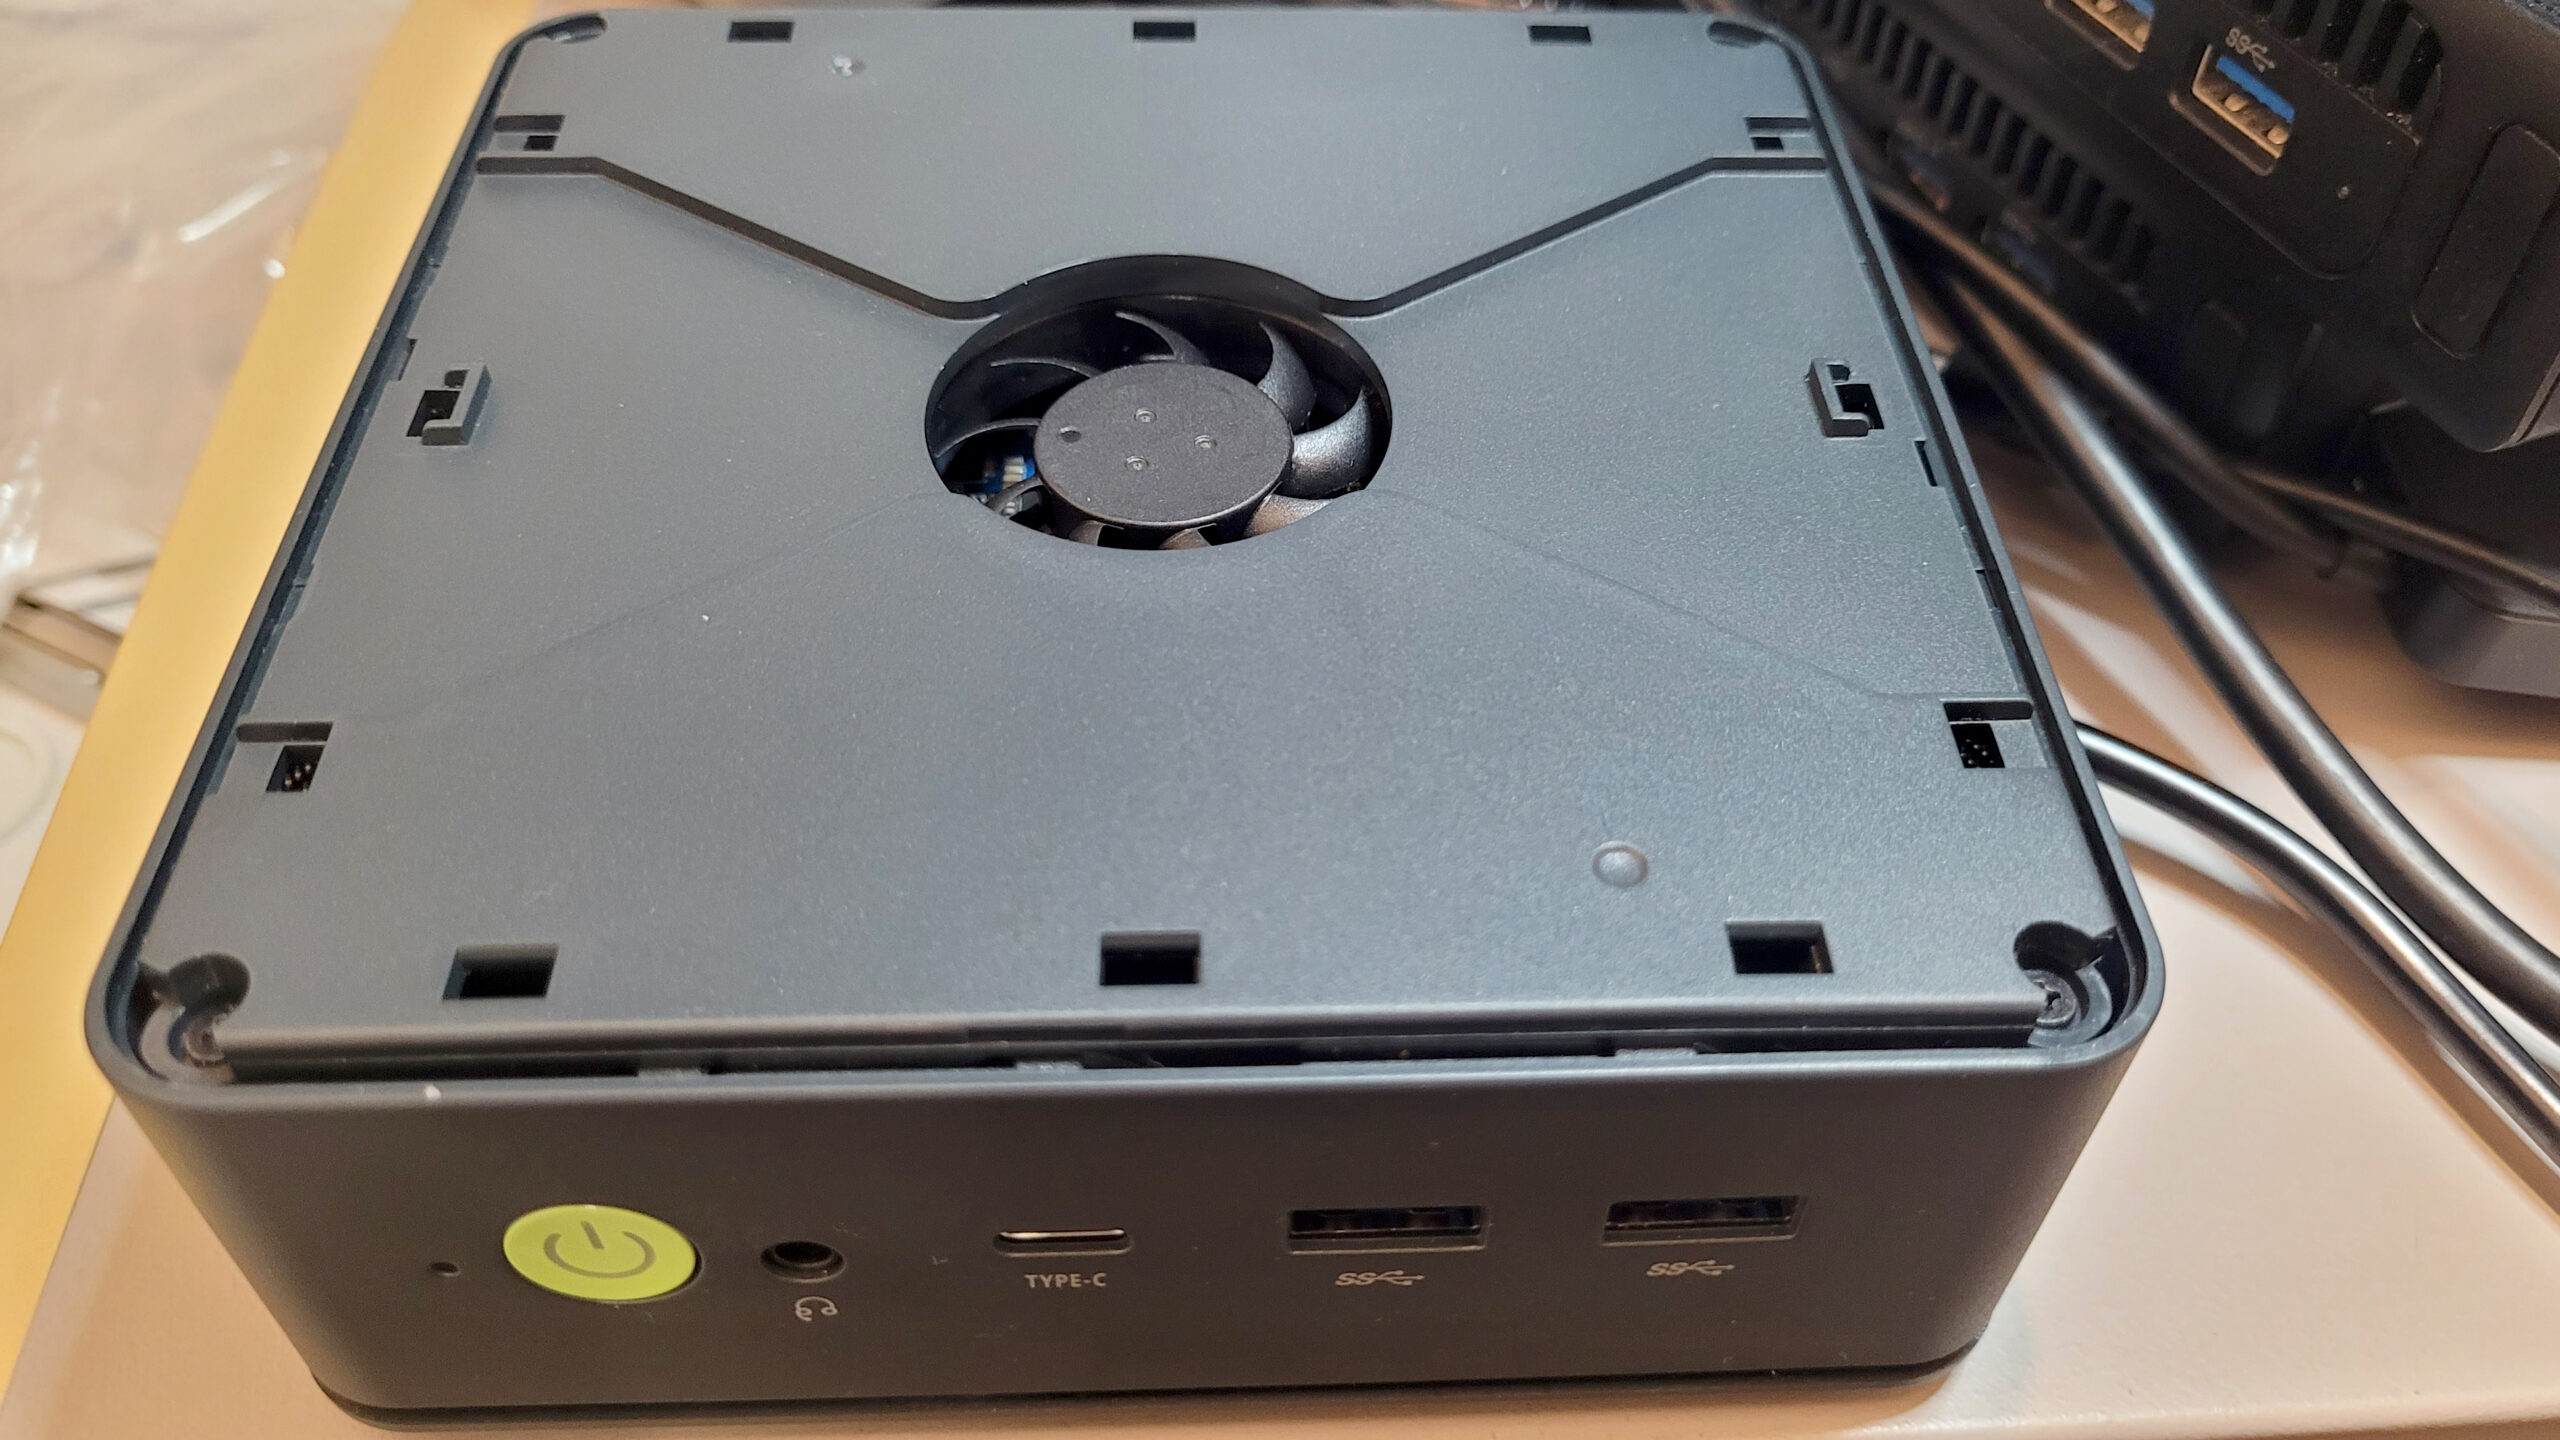
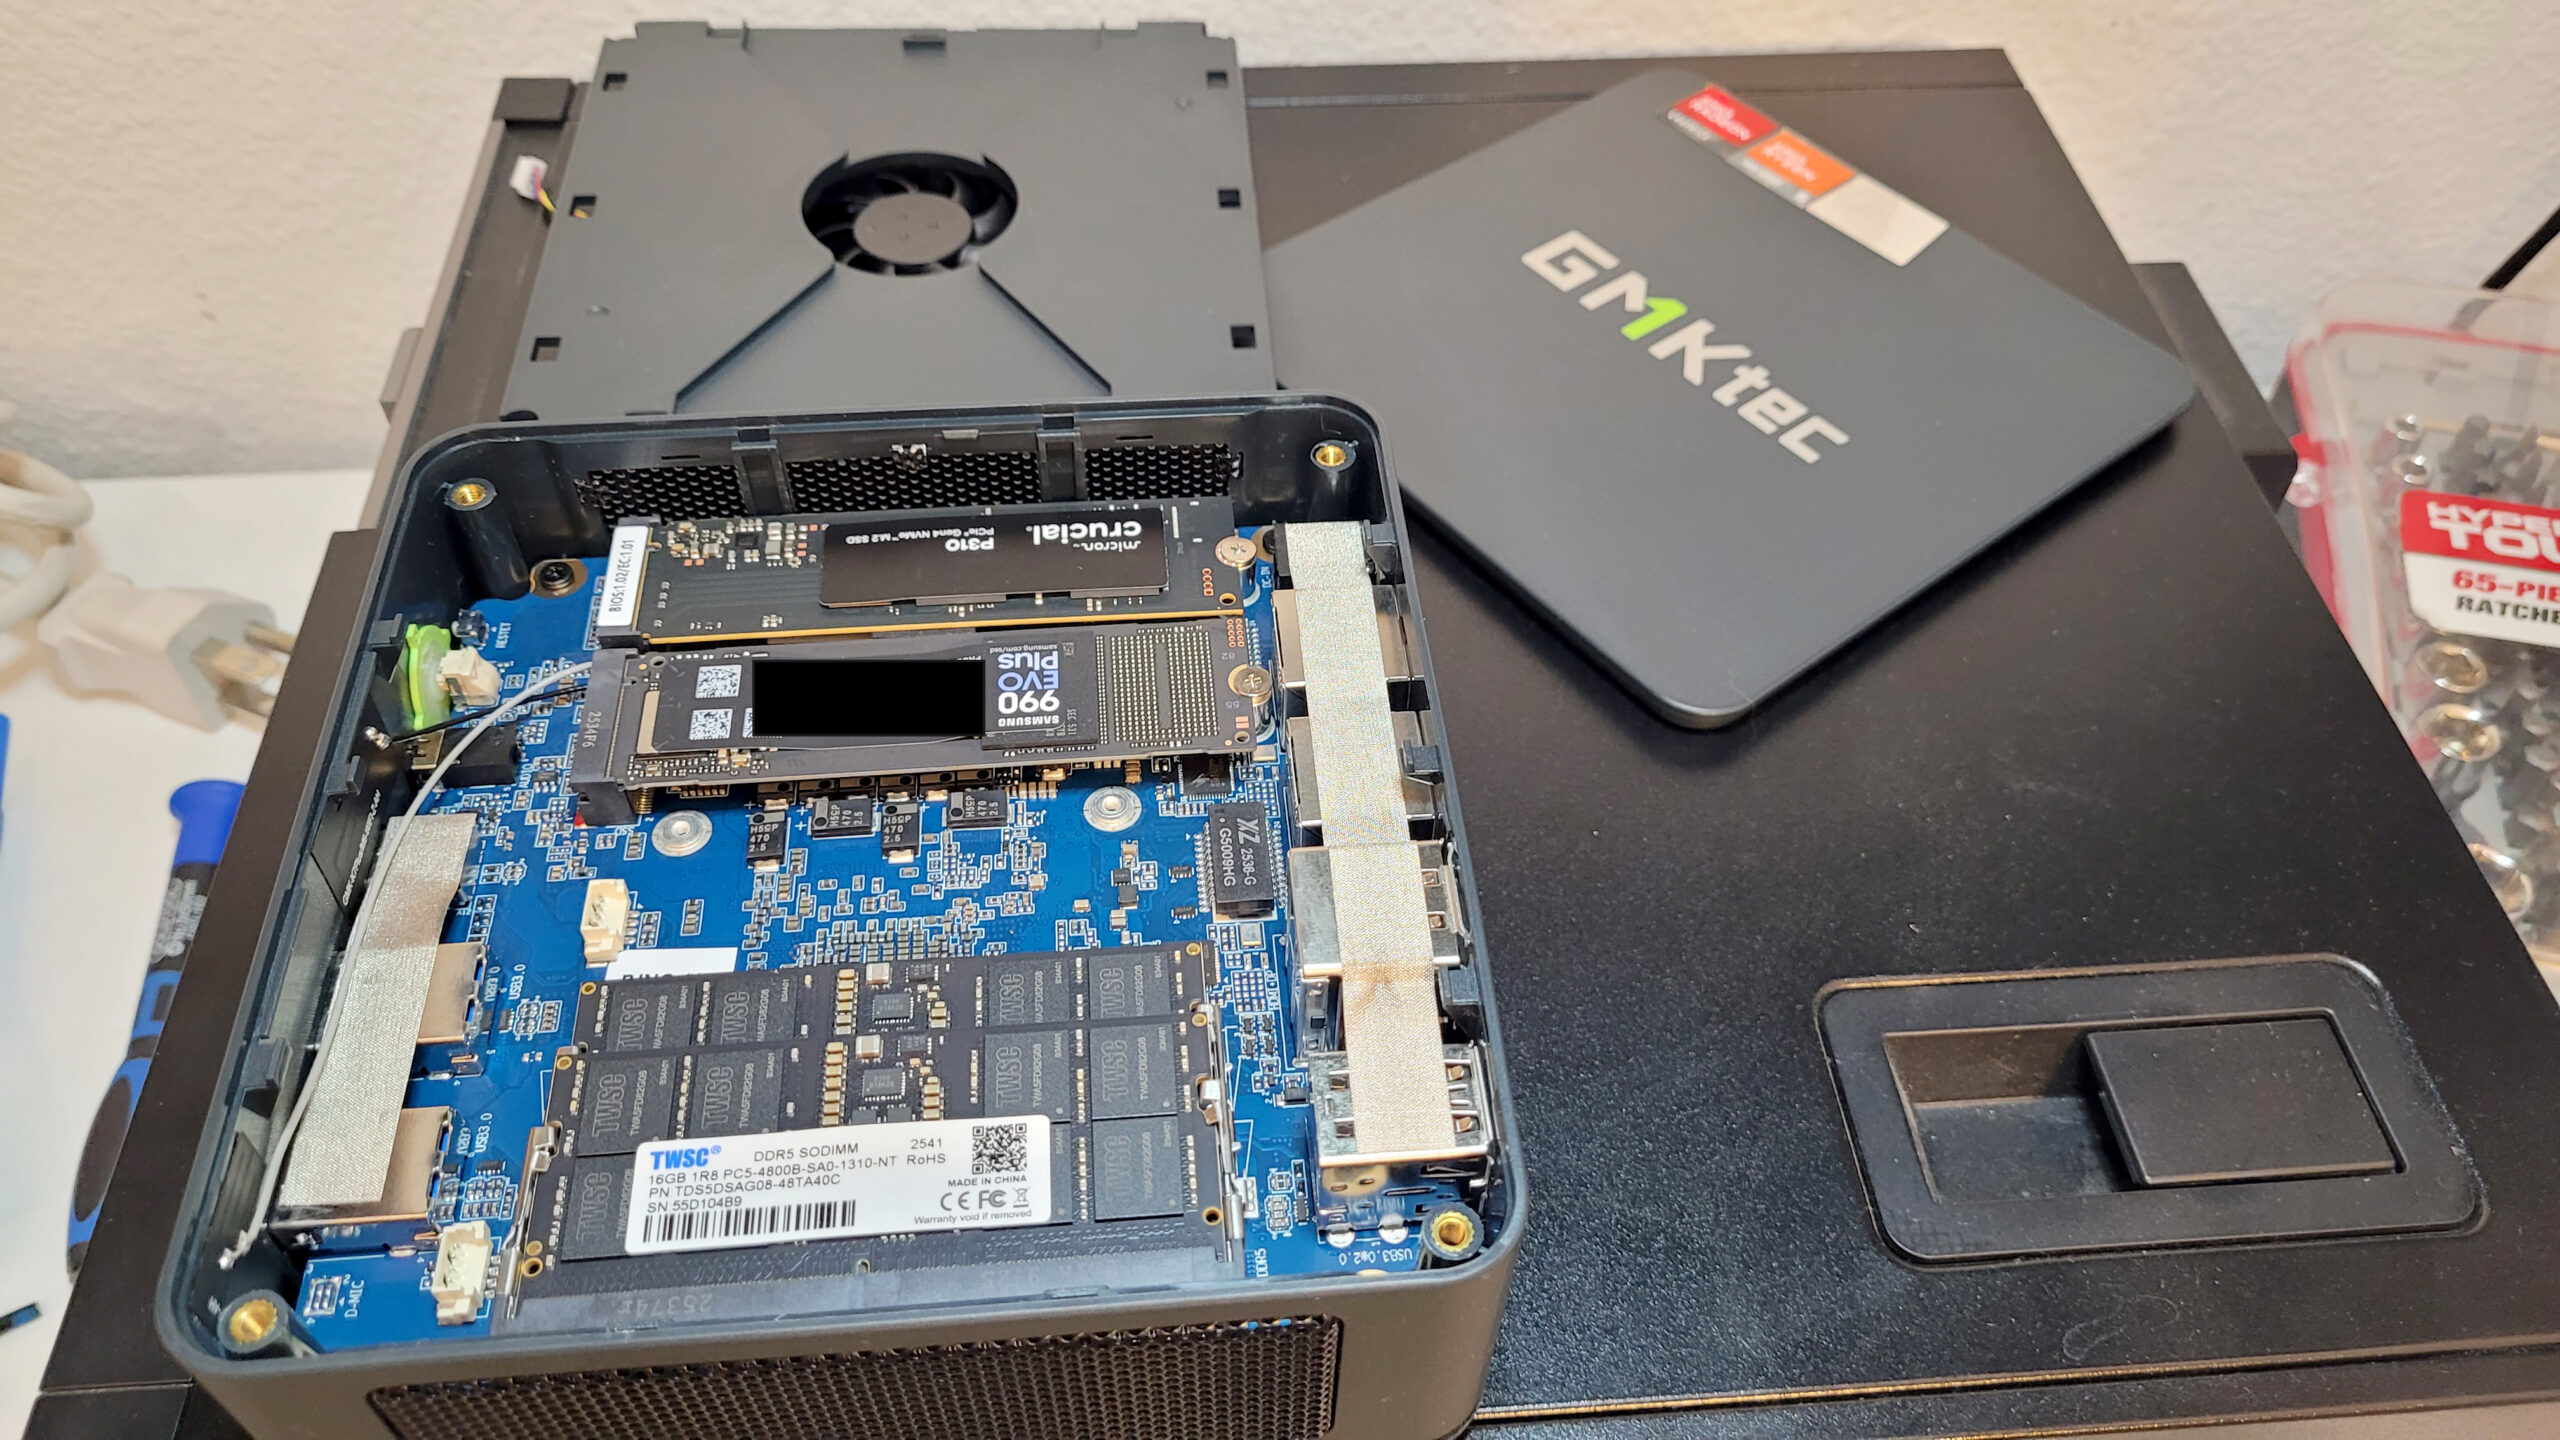
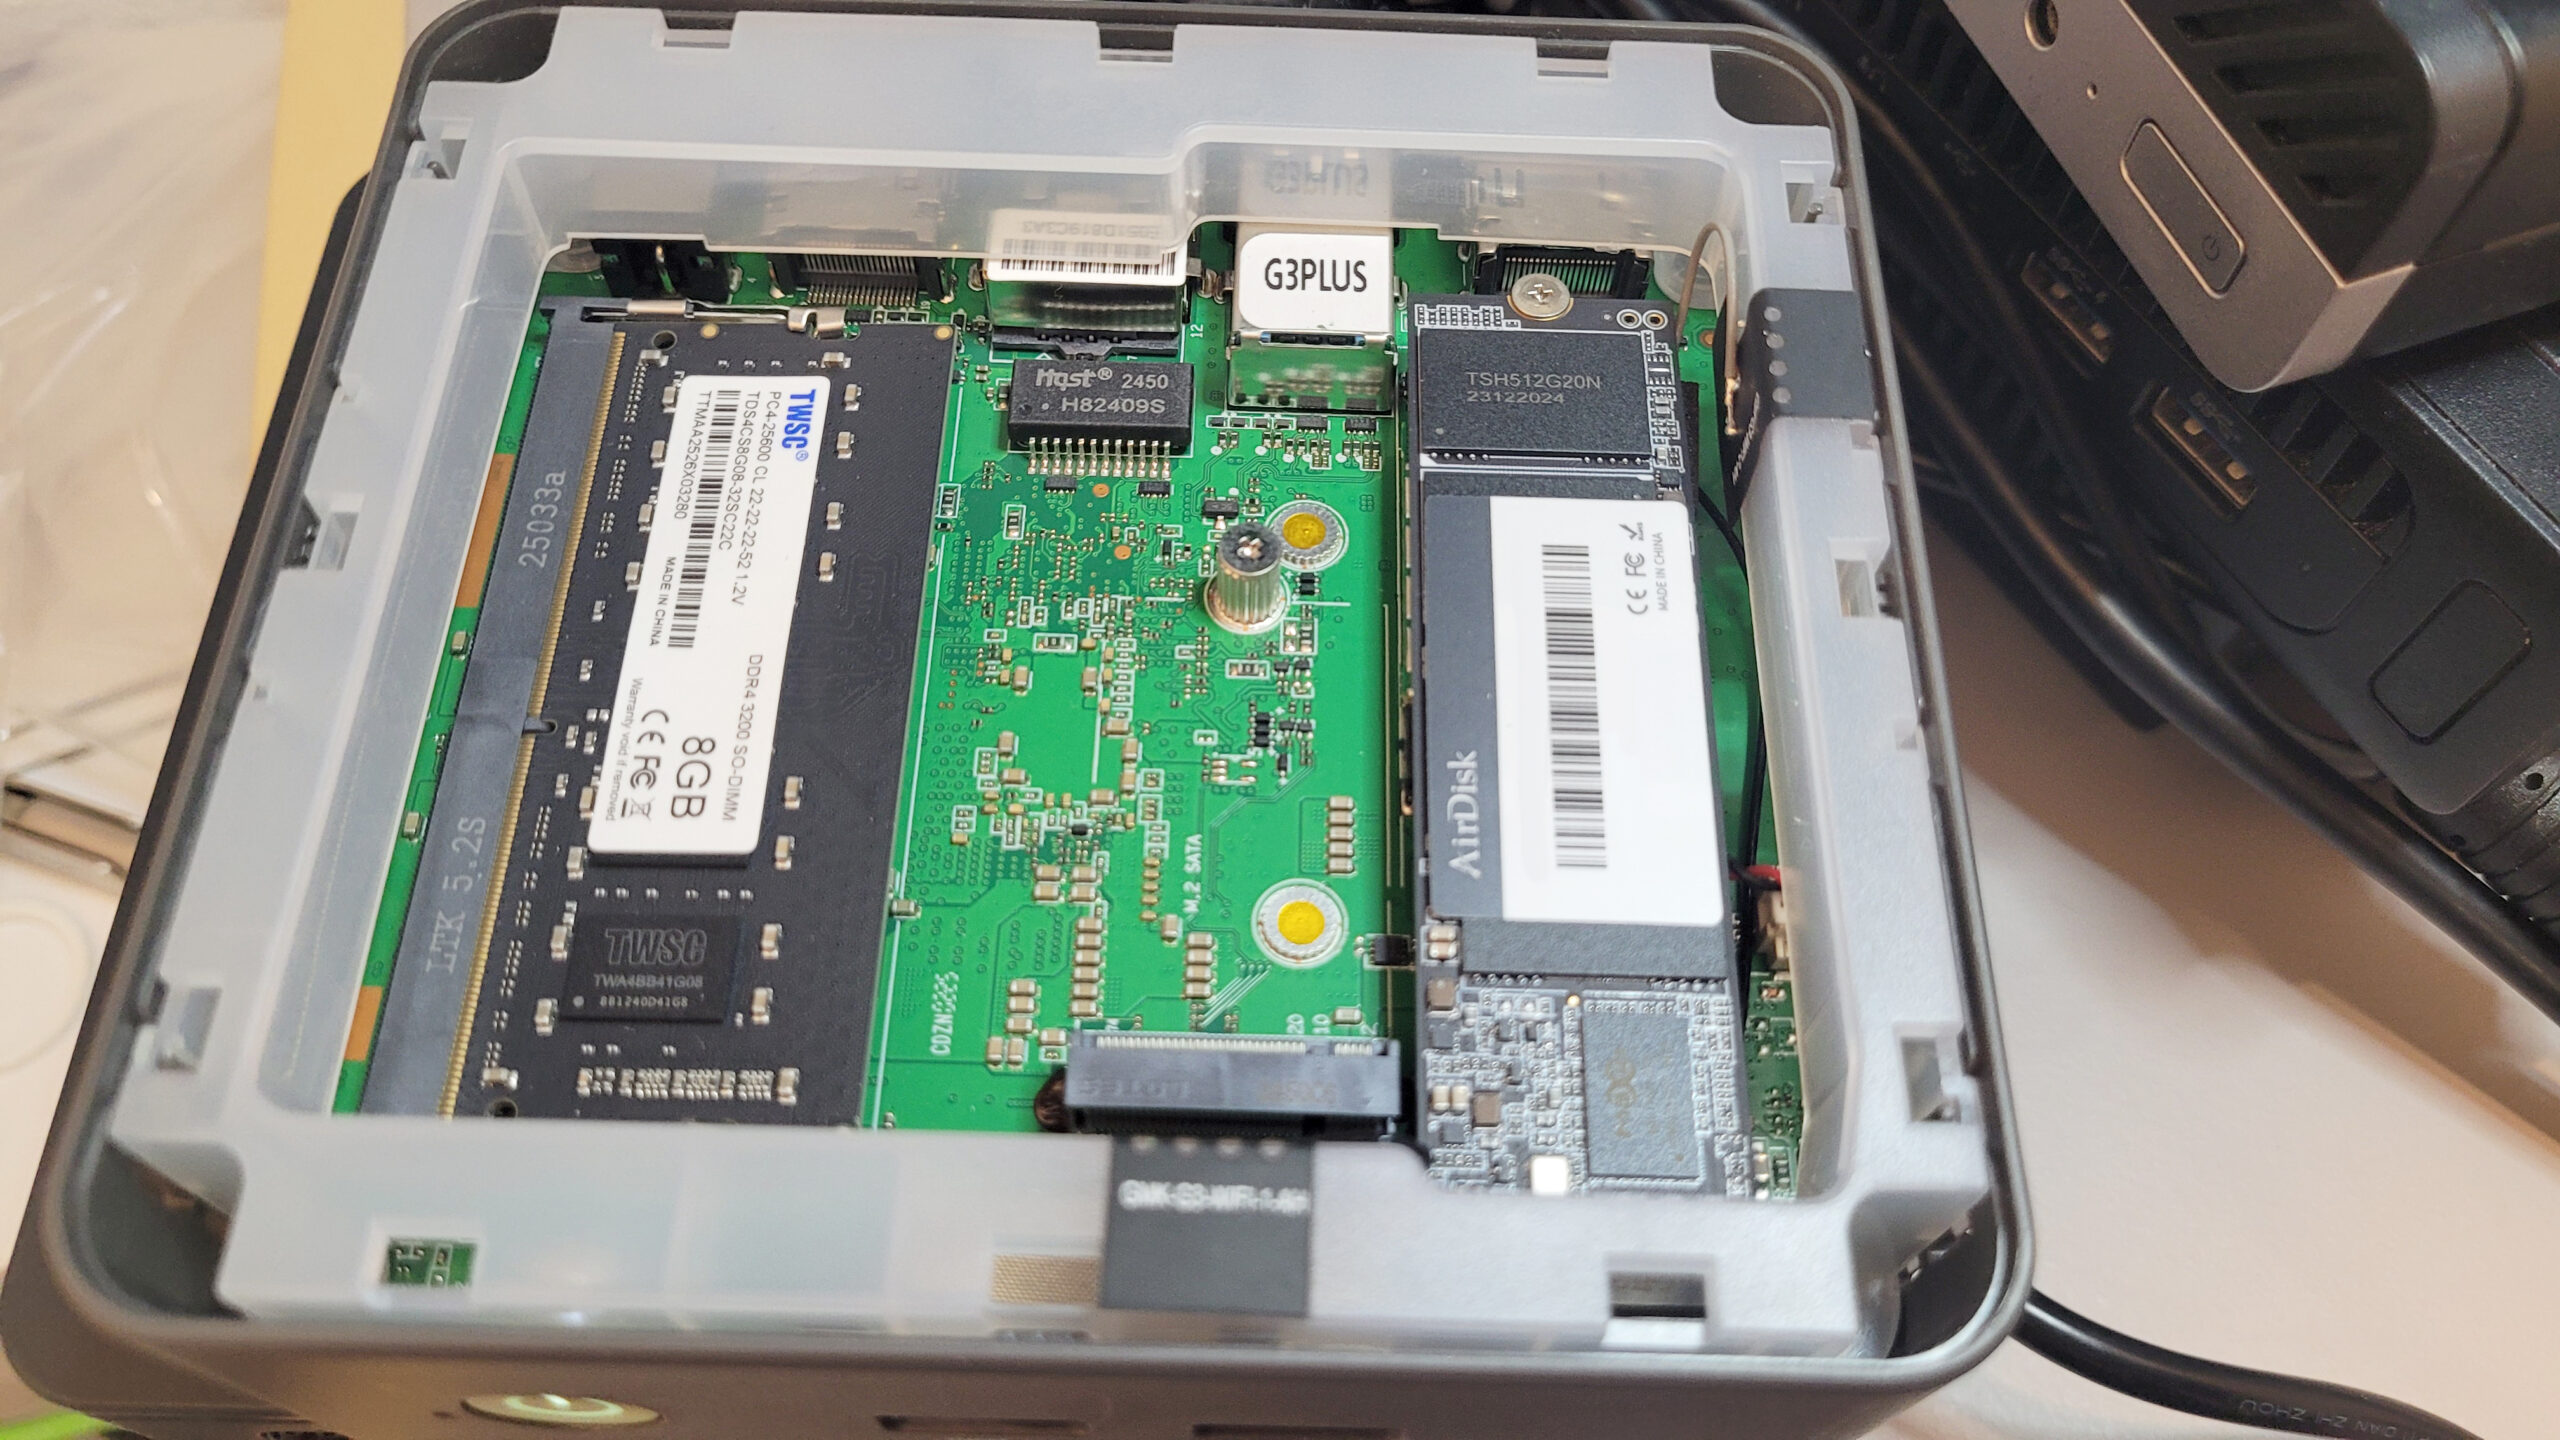
Although these brands are all Chinese, they are compatible with parts that come from well-known global manufacturers, such as Intel, AMD, Crucial, Western Digital, Samsung, Kingston, etc. One single Mini PC can include an incredible amount of internal and external ports for extreme flexibility. This includes USB 3.x ports, 3.5mm Audio, USB-C, OCulink, Dual or Triple monitor support with HDMI and DisplayPorts, Dual-Lan, a serial port, and a built in Wi-Fi Card, while internally allowing for multiple NVMe drives, SATA drives, and memory cards. You can also create an All-in-One PC by mounting them to the back of any monitor – and yes the bracket is included.
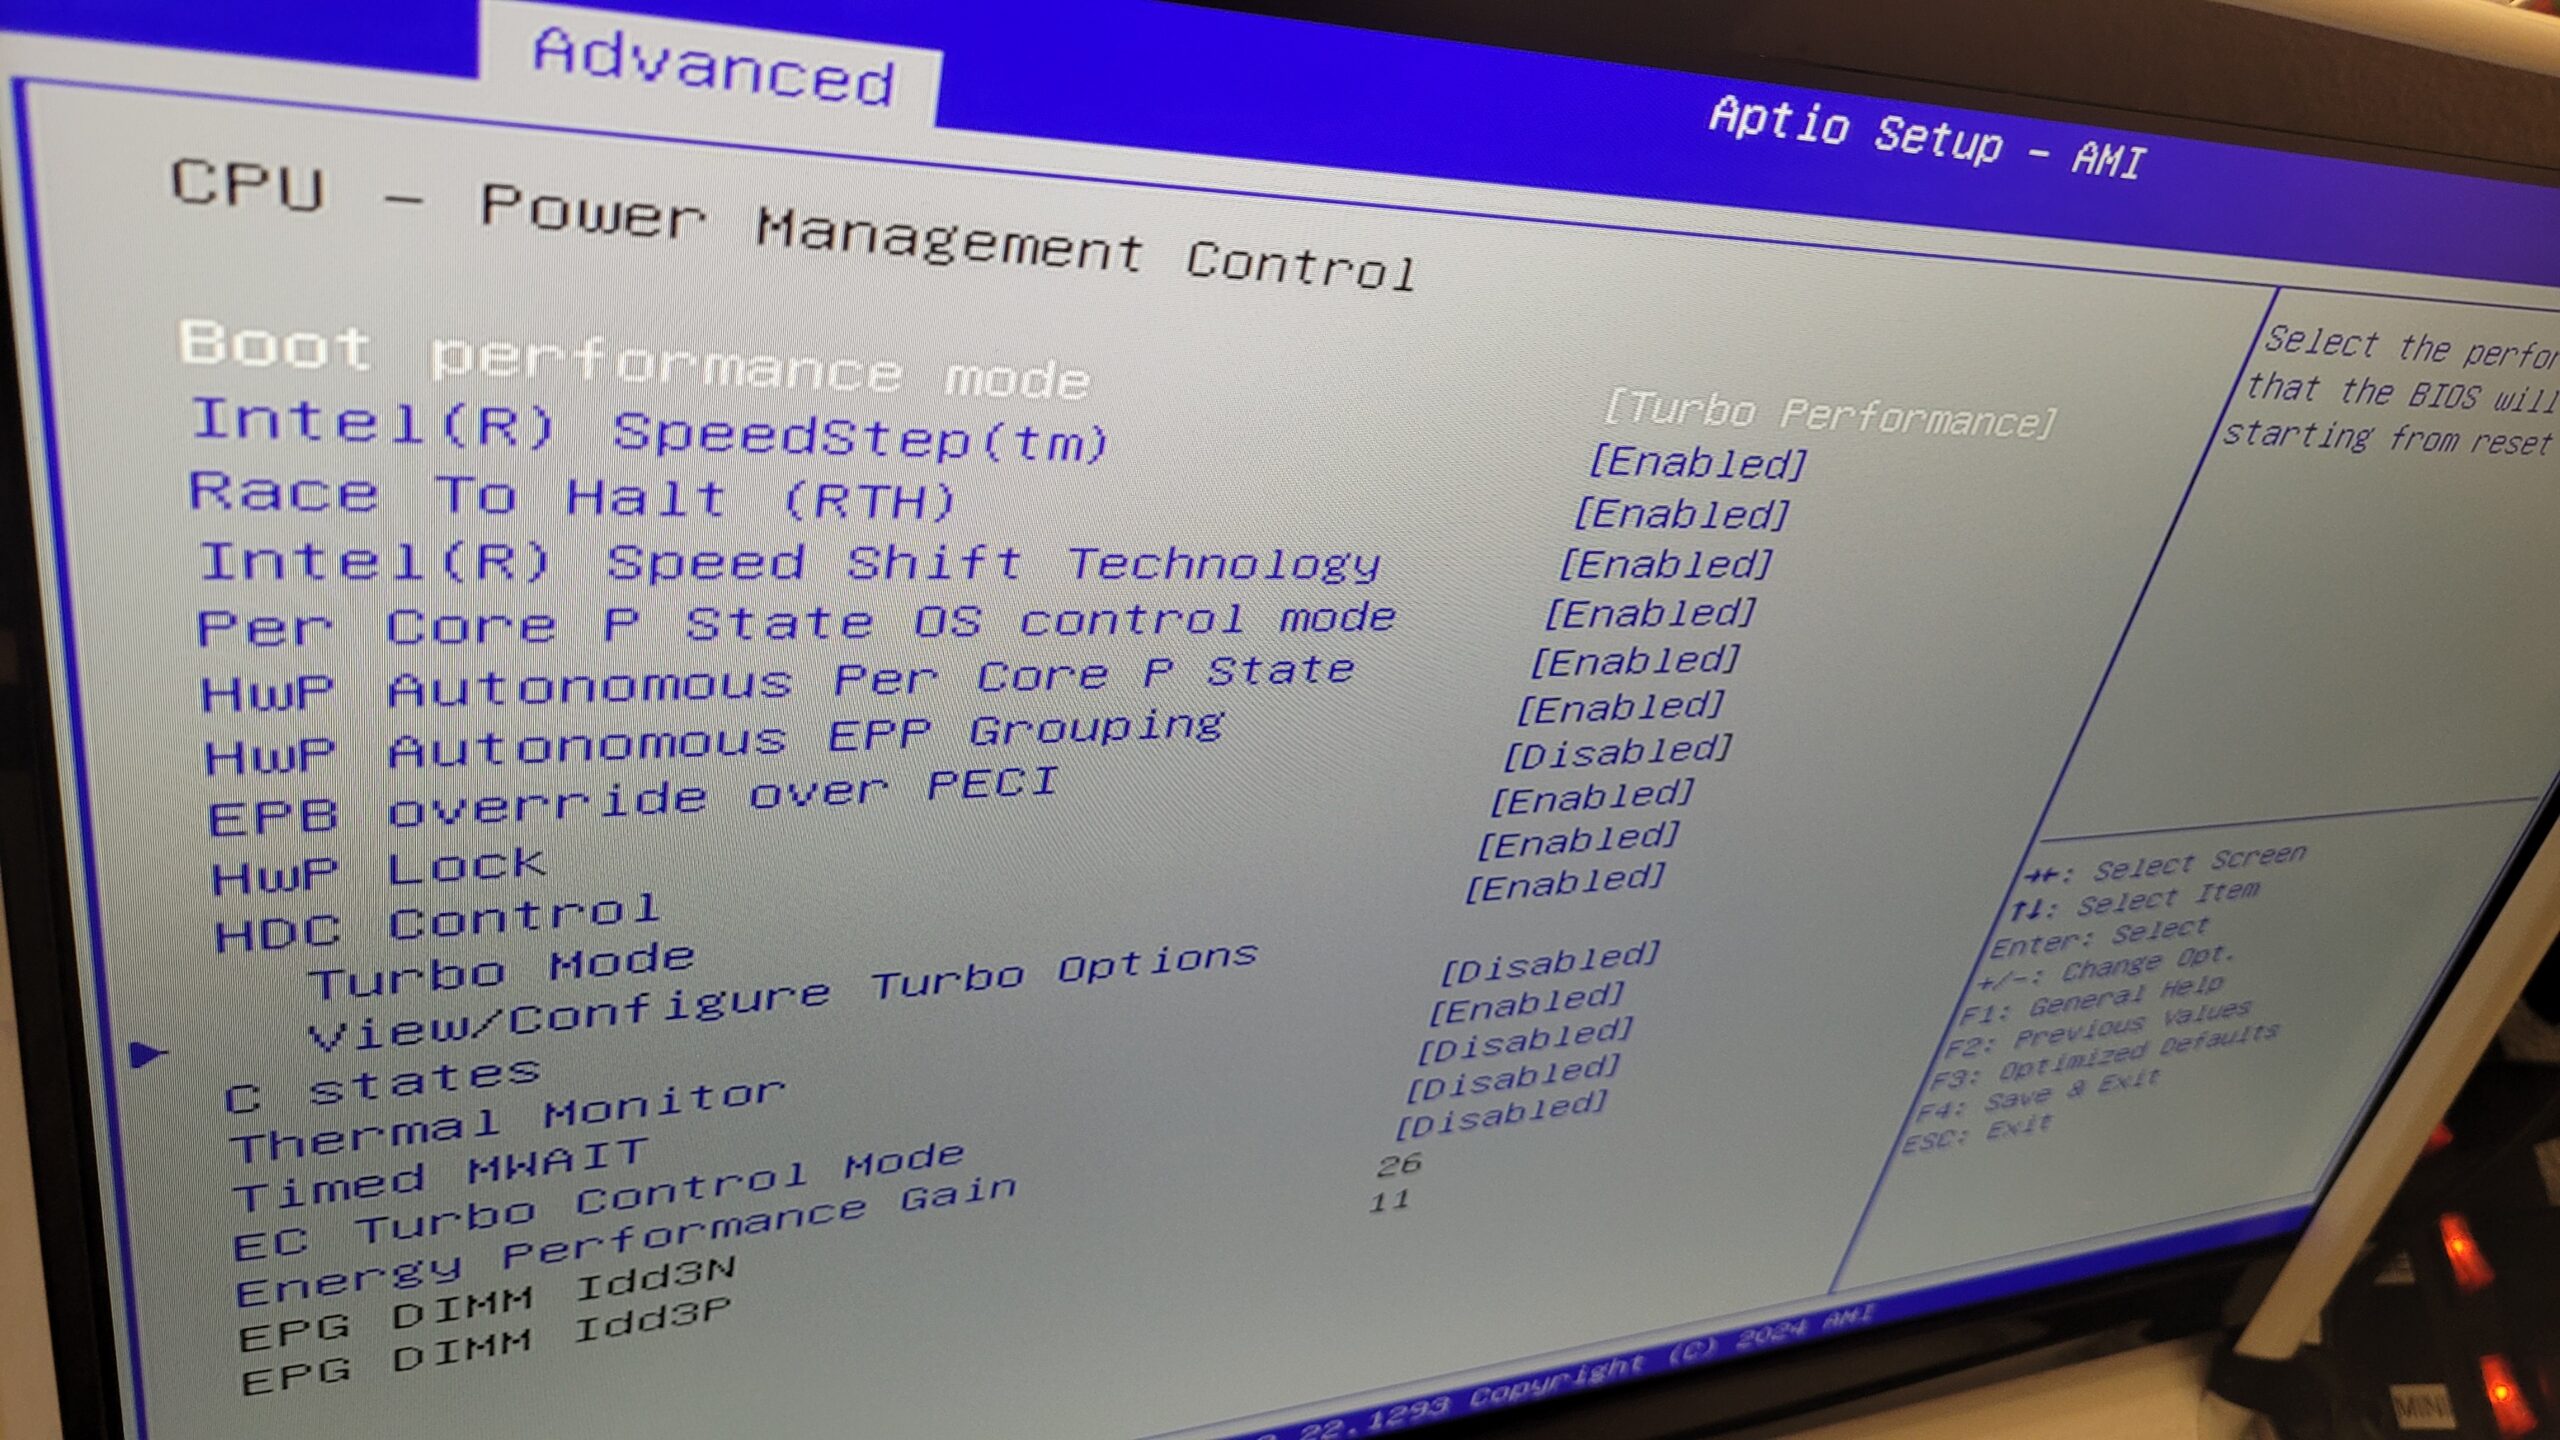
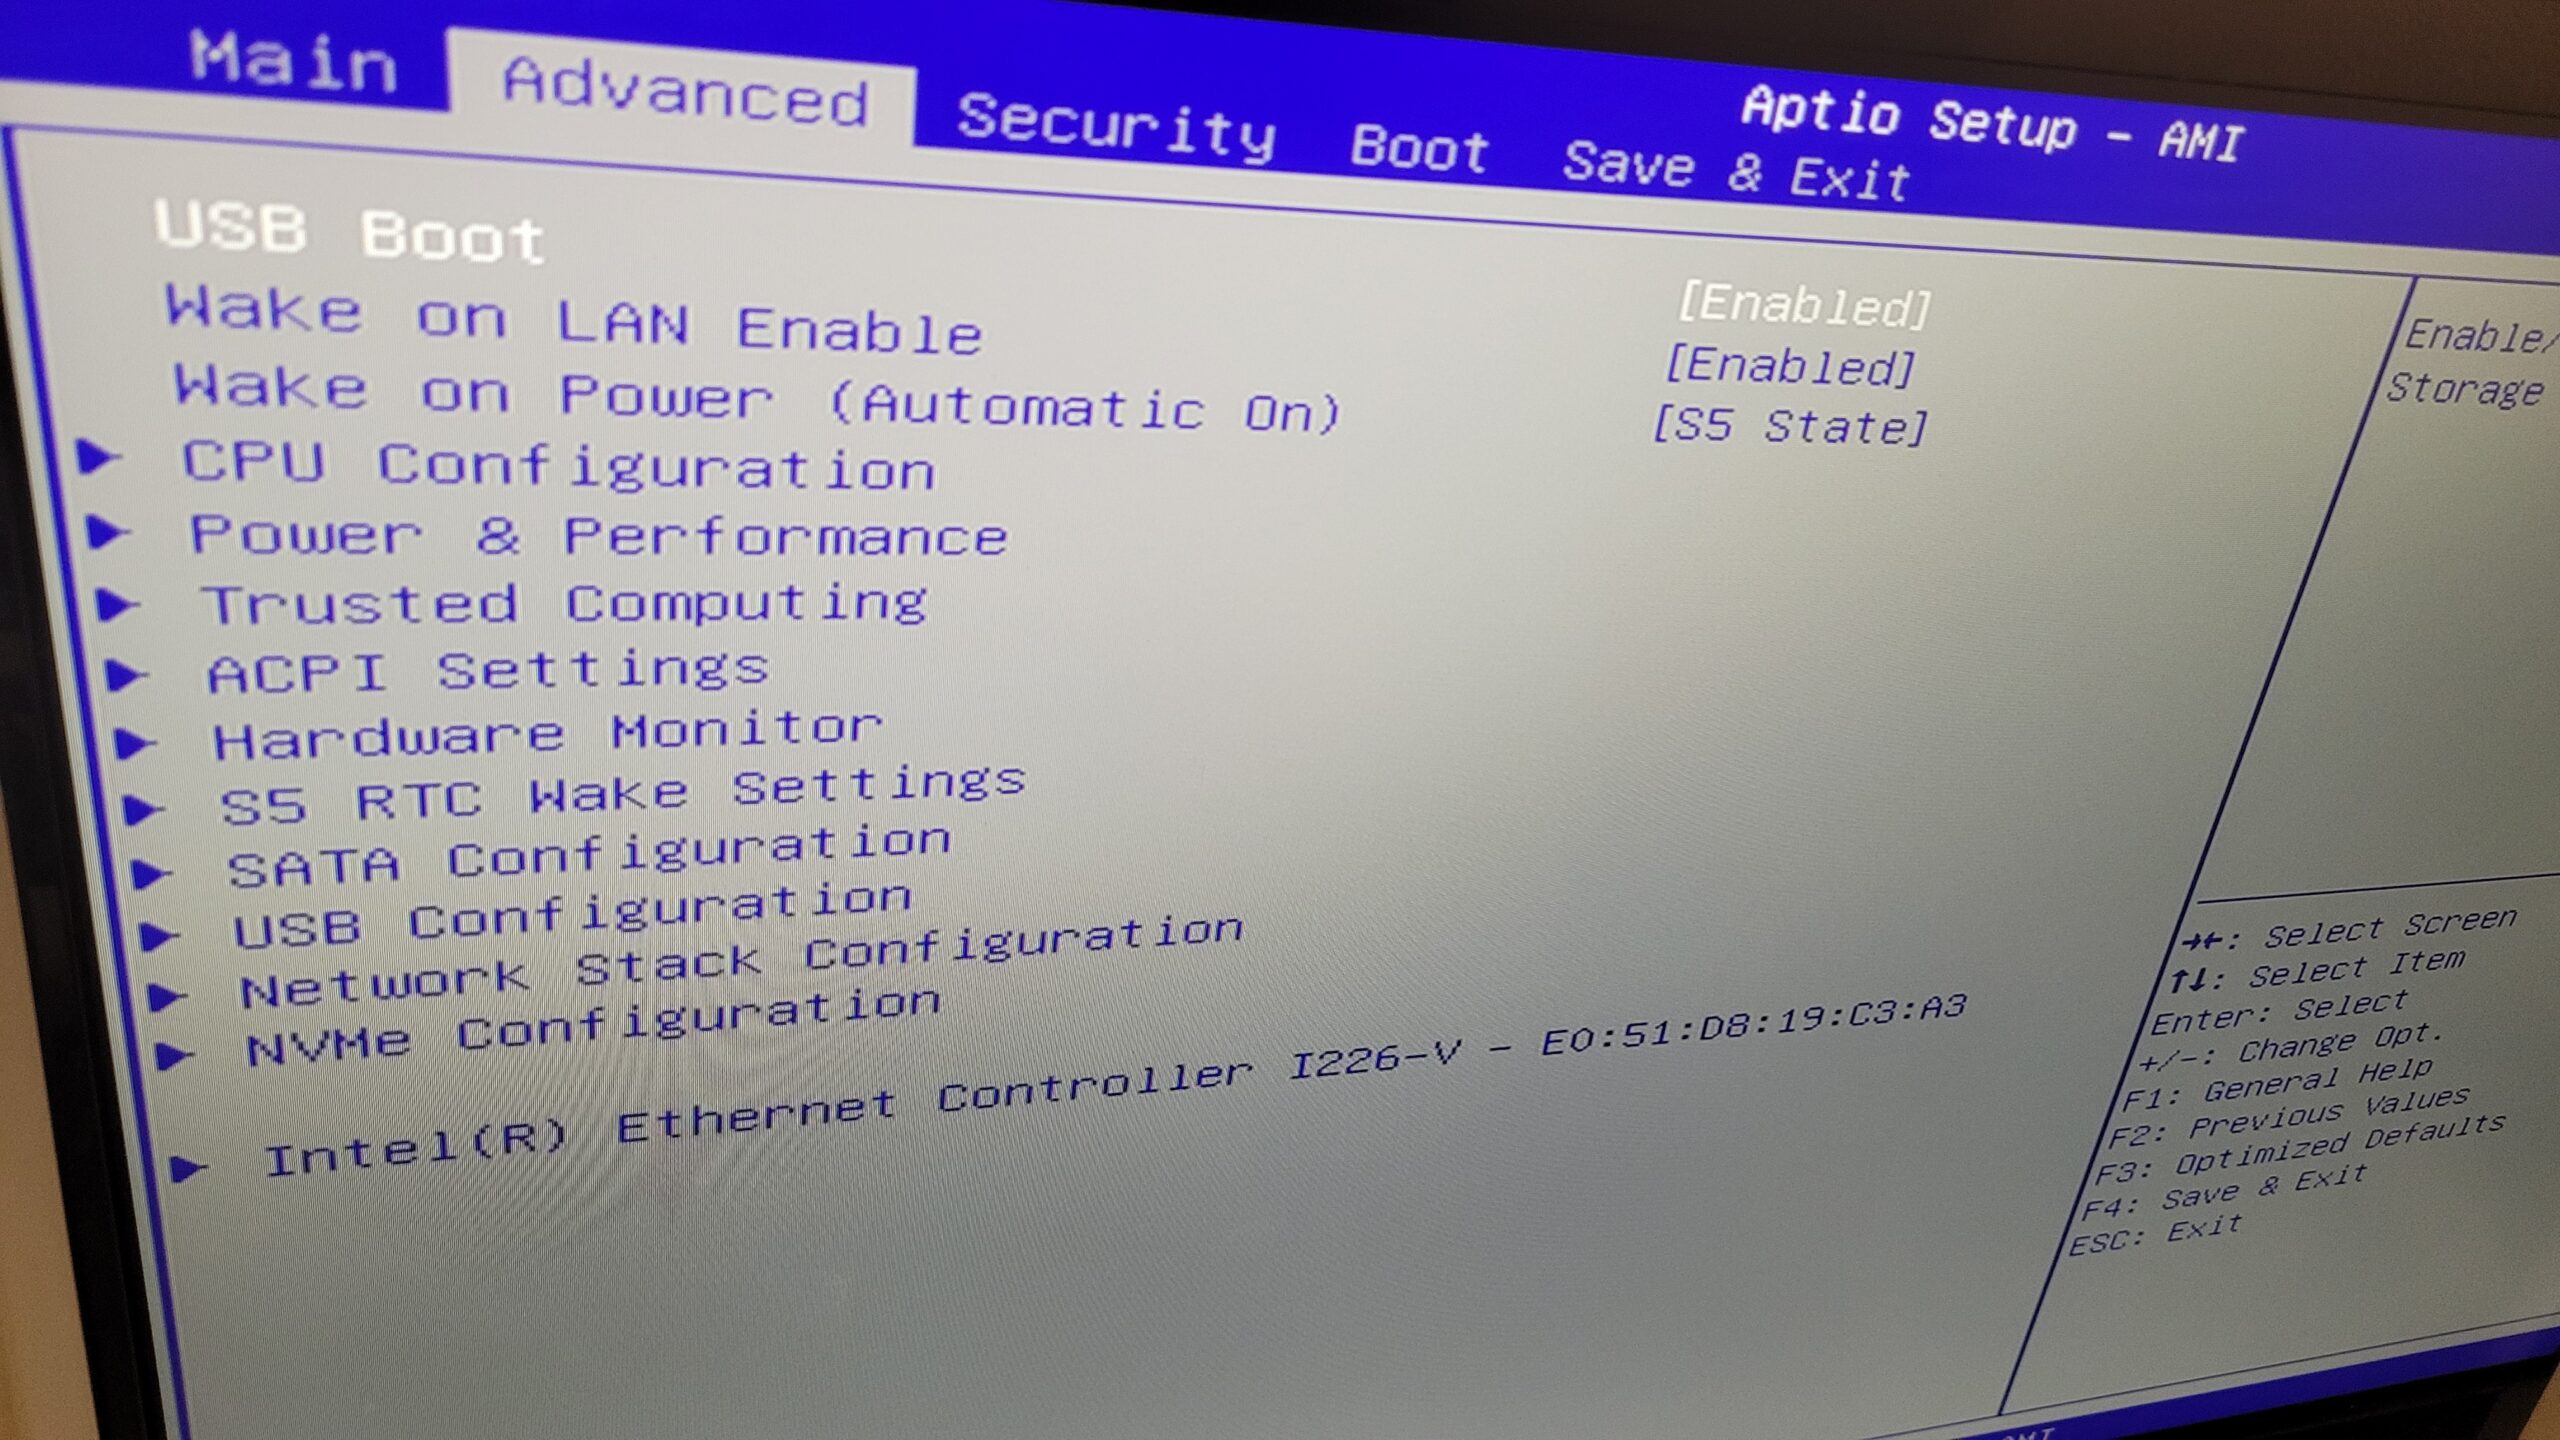
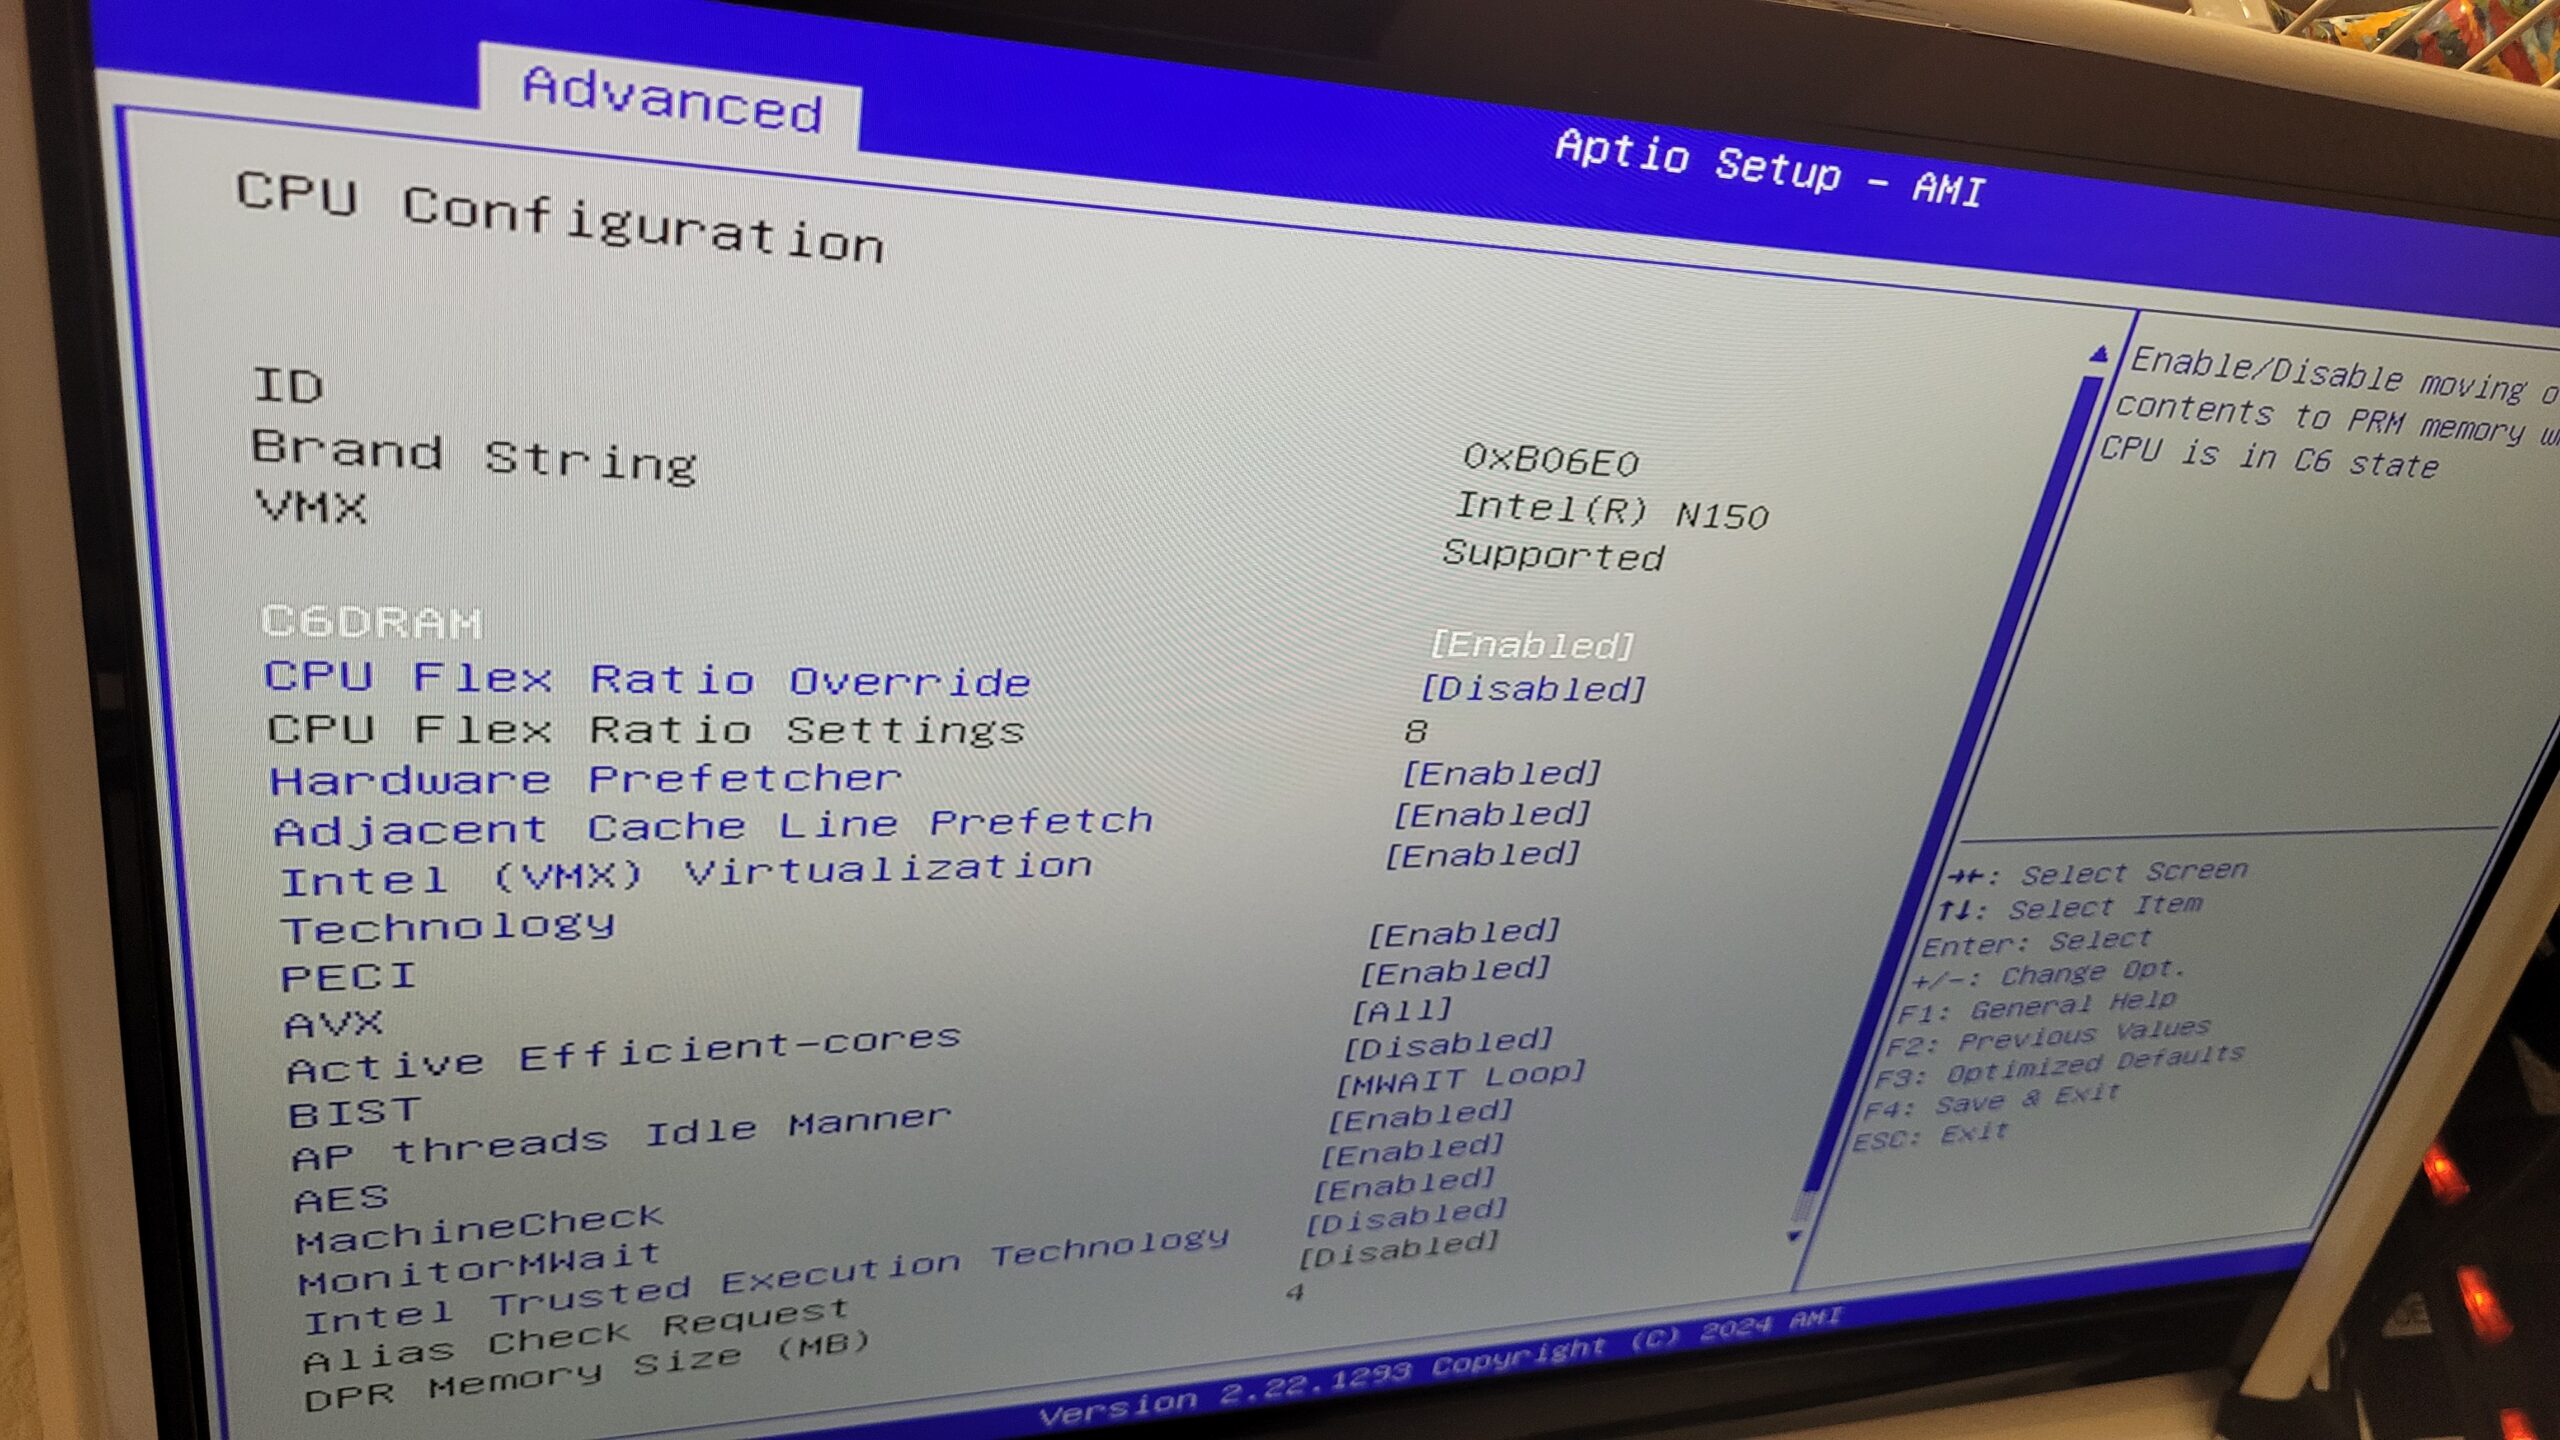
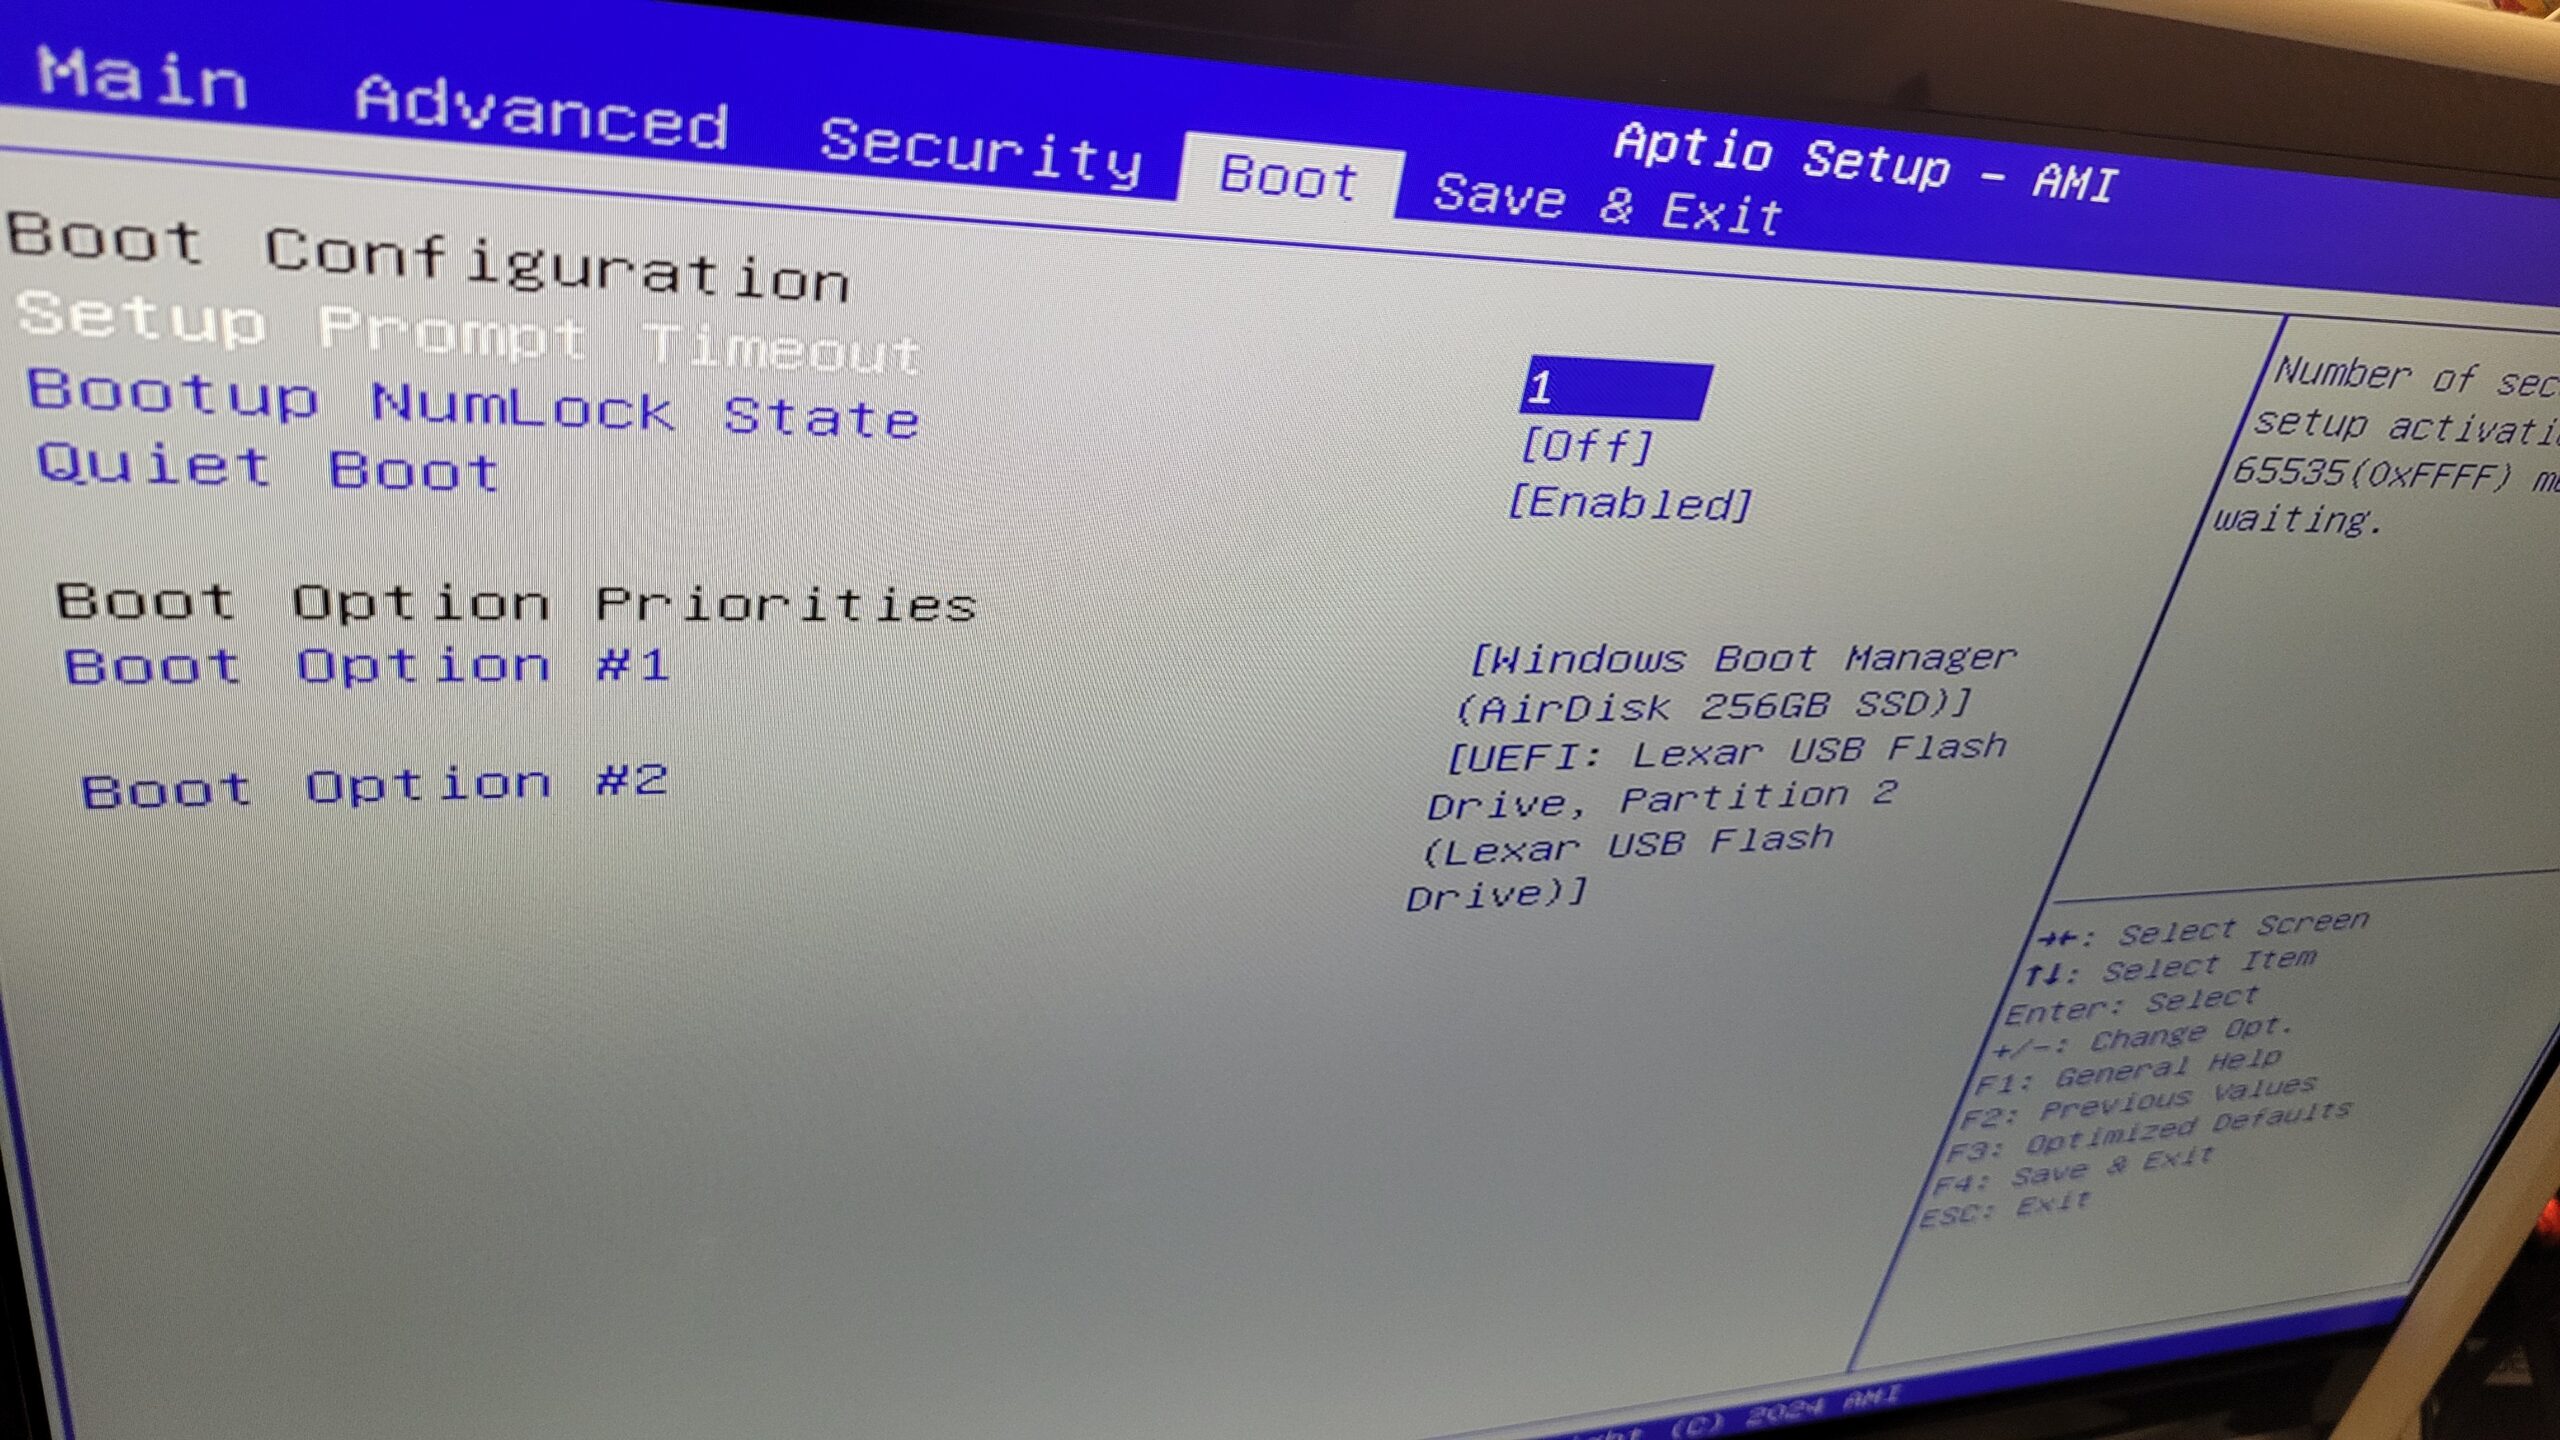
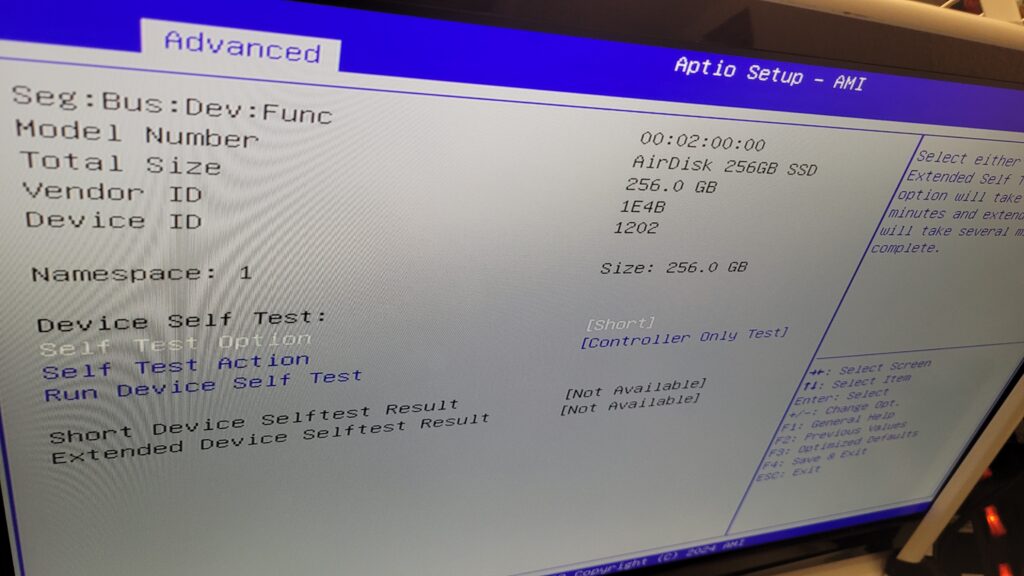
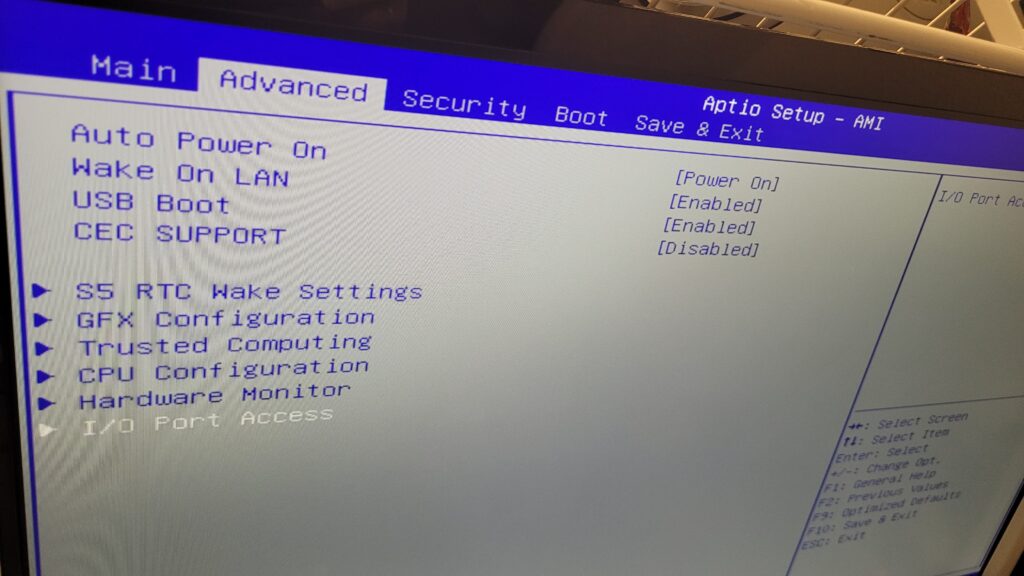
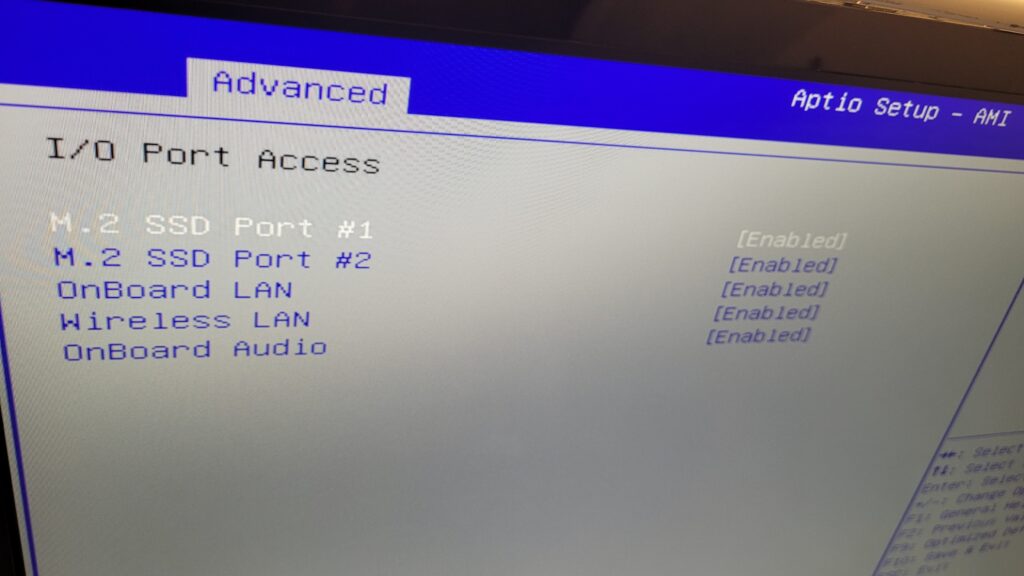
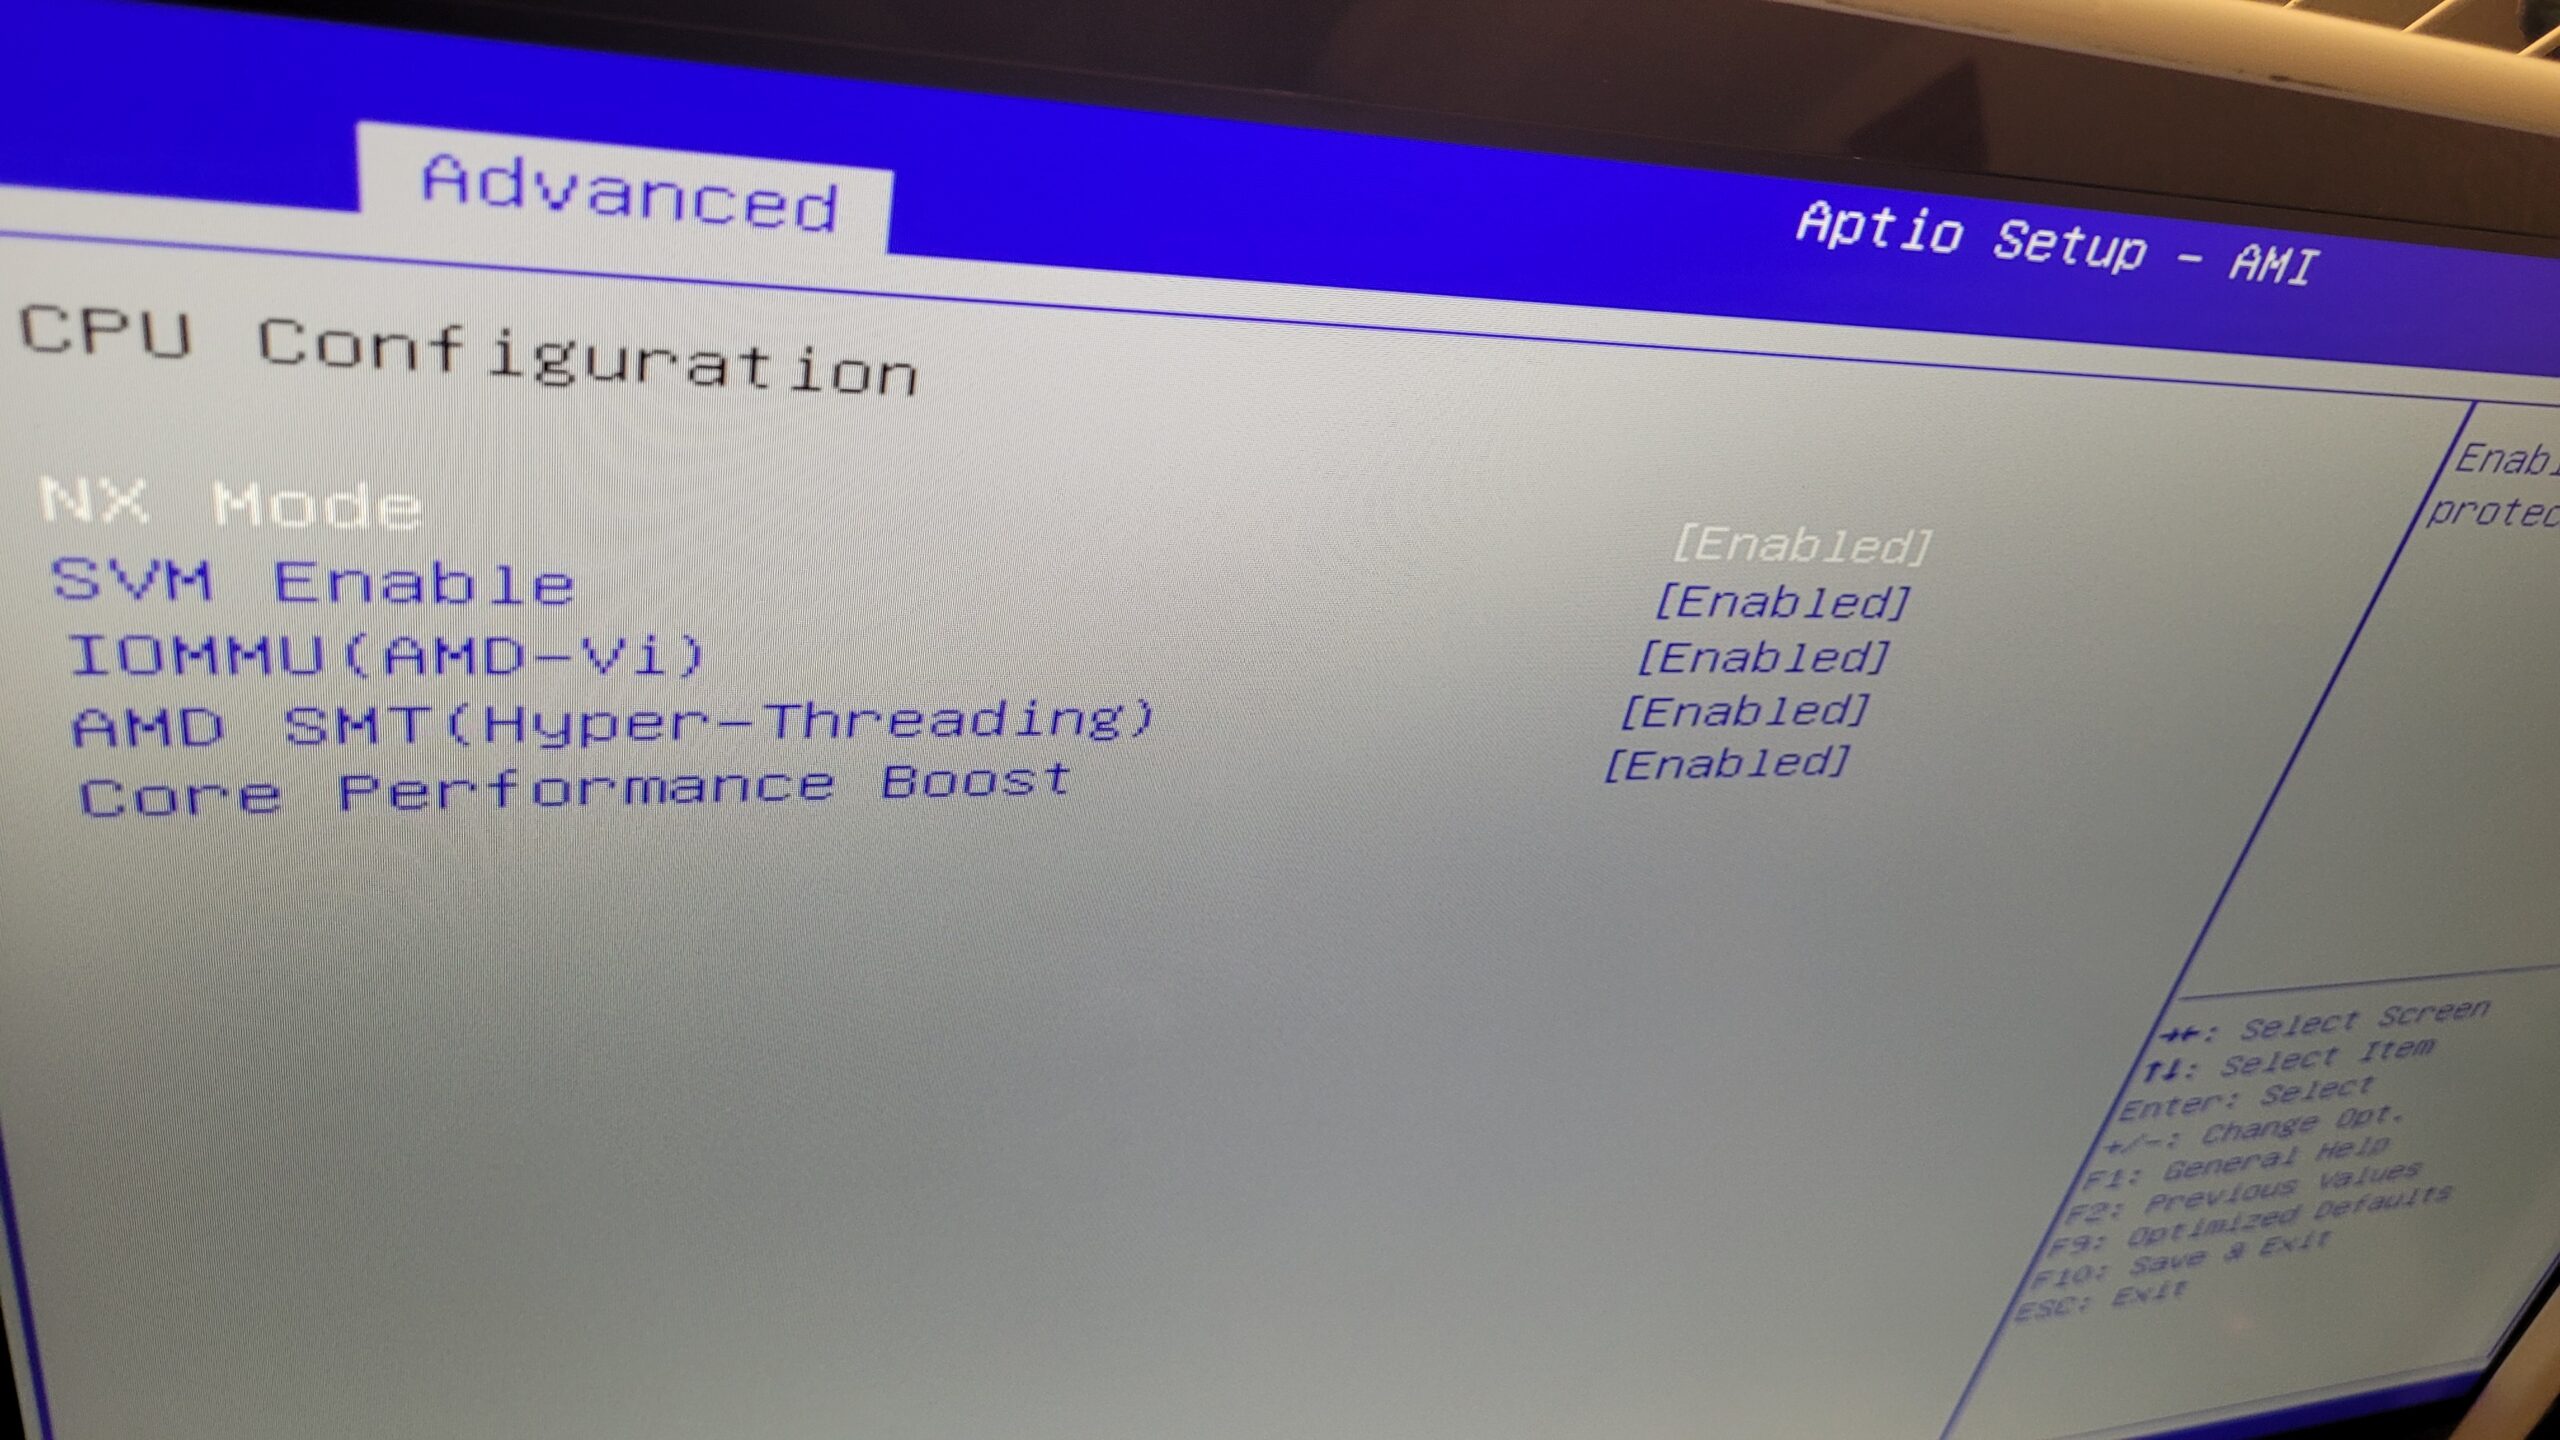
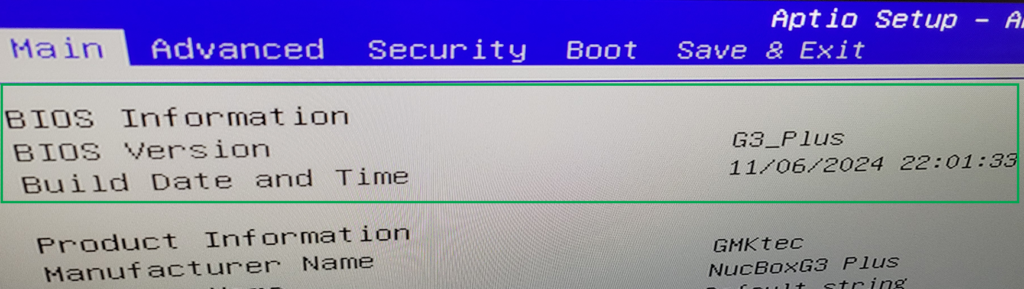
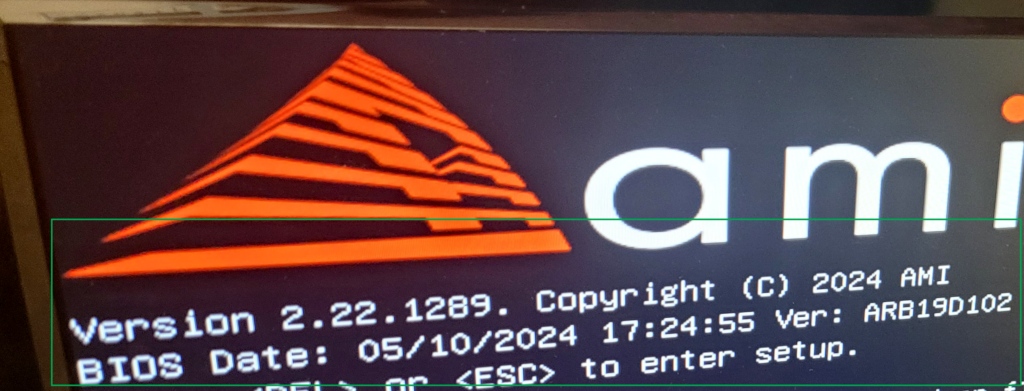
The BIOS varies by manufacturer, but every single one has many options that advanced users may enjoy, such as Wake on LAN, USB boot options, Video memory assignment, Thermal Monitor, Secure Boot, Performance Mode, Self Diagnostics/Tests, Enable/Disable individual components (Drive ports, LAN, WiFi, Sound, etc), Wake options, etc. – See pics below for some of the options – click to expand.
The internal graphics cards exceeded expectations, easily handling dual and triple monitors. Some models included the AMD Radeon 760M, AMD Radeon 780M, AMD Radeon Vega, AMD Radeon 600M Series, Intel Iris Xe or the Intel UDH Graphics. To see benchmarks for these videos cards, please see here.
PC/Components Quality
As of writing this article in 03/22/2026 there have been no major failures. Only 4 incidents have taken place:
- GMKtec NukBox K6 – Top fan bearing failure – Possibly due to user leaving heavy objects on top
- BOSGAME P2 – Top fan bearing failure – Same as above
- GMKtec NukBox K6 – AMI BIOS Displayed the following BIOS error message after PC was turned on:
New CPU installed, fTPM/PSP NV corrupted or fTPM/PSP NV structure changed ..
Press Y to reset fTPM, if you have BitLocker or encryption enabled,
the system will not boot without a recovery key
Press N to keep previous fTPM record and continue system boot, fTPM will NOT
enable in new CPU, you can swap back to the old CPU to recover TPM related
Keys and data. - BOSGAME P2 – Windows 11 Pro had to be reinstalled due to updates failure – This was a known bad update released by Microsoft.
- GMKTec Nukbox K6 – Windows activation failure after being reinstalled.
For Incidents 1 and 2 both BOSGAME and GMKTec’s support responded quickly to sending new fans. Click here to see a picture of the replacement fans for the GMKTec. These Mini PCs are incredibly easy to open and work inside of them – for most of them the top cover pops out, and then 4 screws hold the top fan in place. For Incident 3 and 4 – the fTPM was cleared and Windows was reinstalled which is discussed below. See inside some Mini PCs below (Click to Expand):
For incident #5 – See Below – Solving Windows Activation Issues
In some setups, I did not replace the NVMe drives or RAM shipped with these Mini PCs – and there were definitely some brands and models I had never heard of before:
- TWSC TSC3AN1T0-F6Q10S 1 TB NVMe Drive
- TWSC TSC3AN512-F5T50S 500 GB NVME Drive
- Lexar SSD NM7A1 2TB Drive
- Non Brand NVMe 512GB SSD
- UDSS UD3CS1HT301-512G NVMe Drive
- AirDisk 256GB SSD
- HighRel 512 GB NVMe
- MasonSemi SSD 1 TB
- Vickter Electronics DDR4 16G 3200 Memory Stick
Regardless of the Brand/Model – I performed tests and benchmarks on all of these drives to check their quality and they performed as expected.

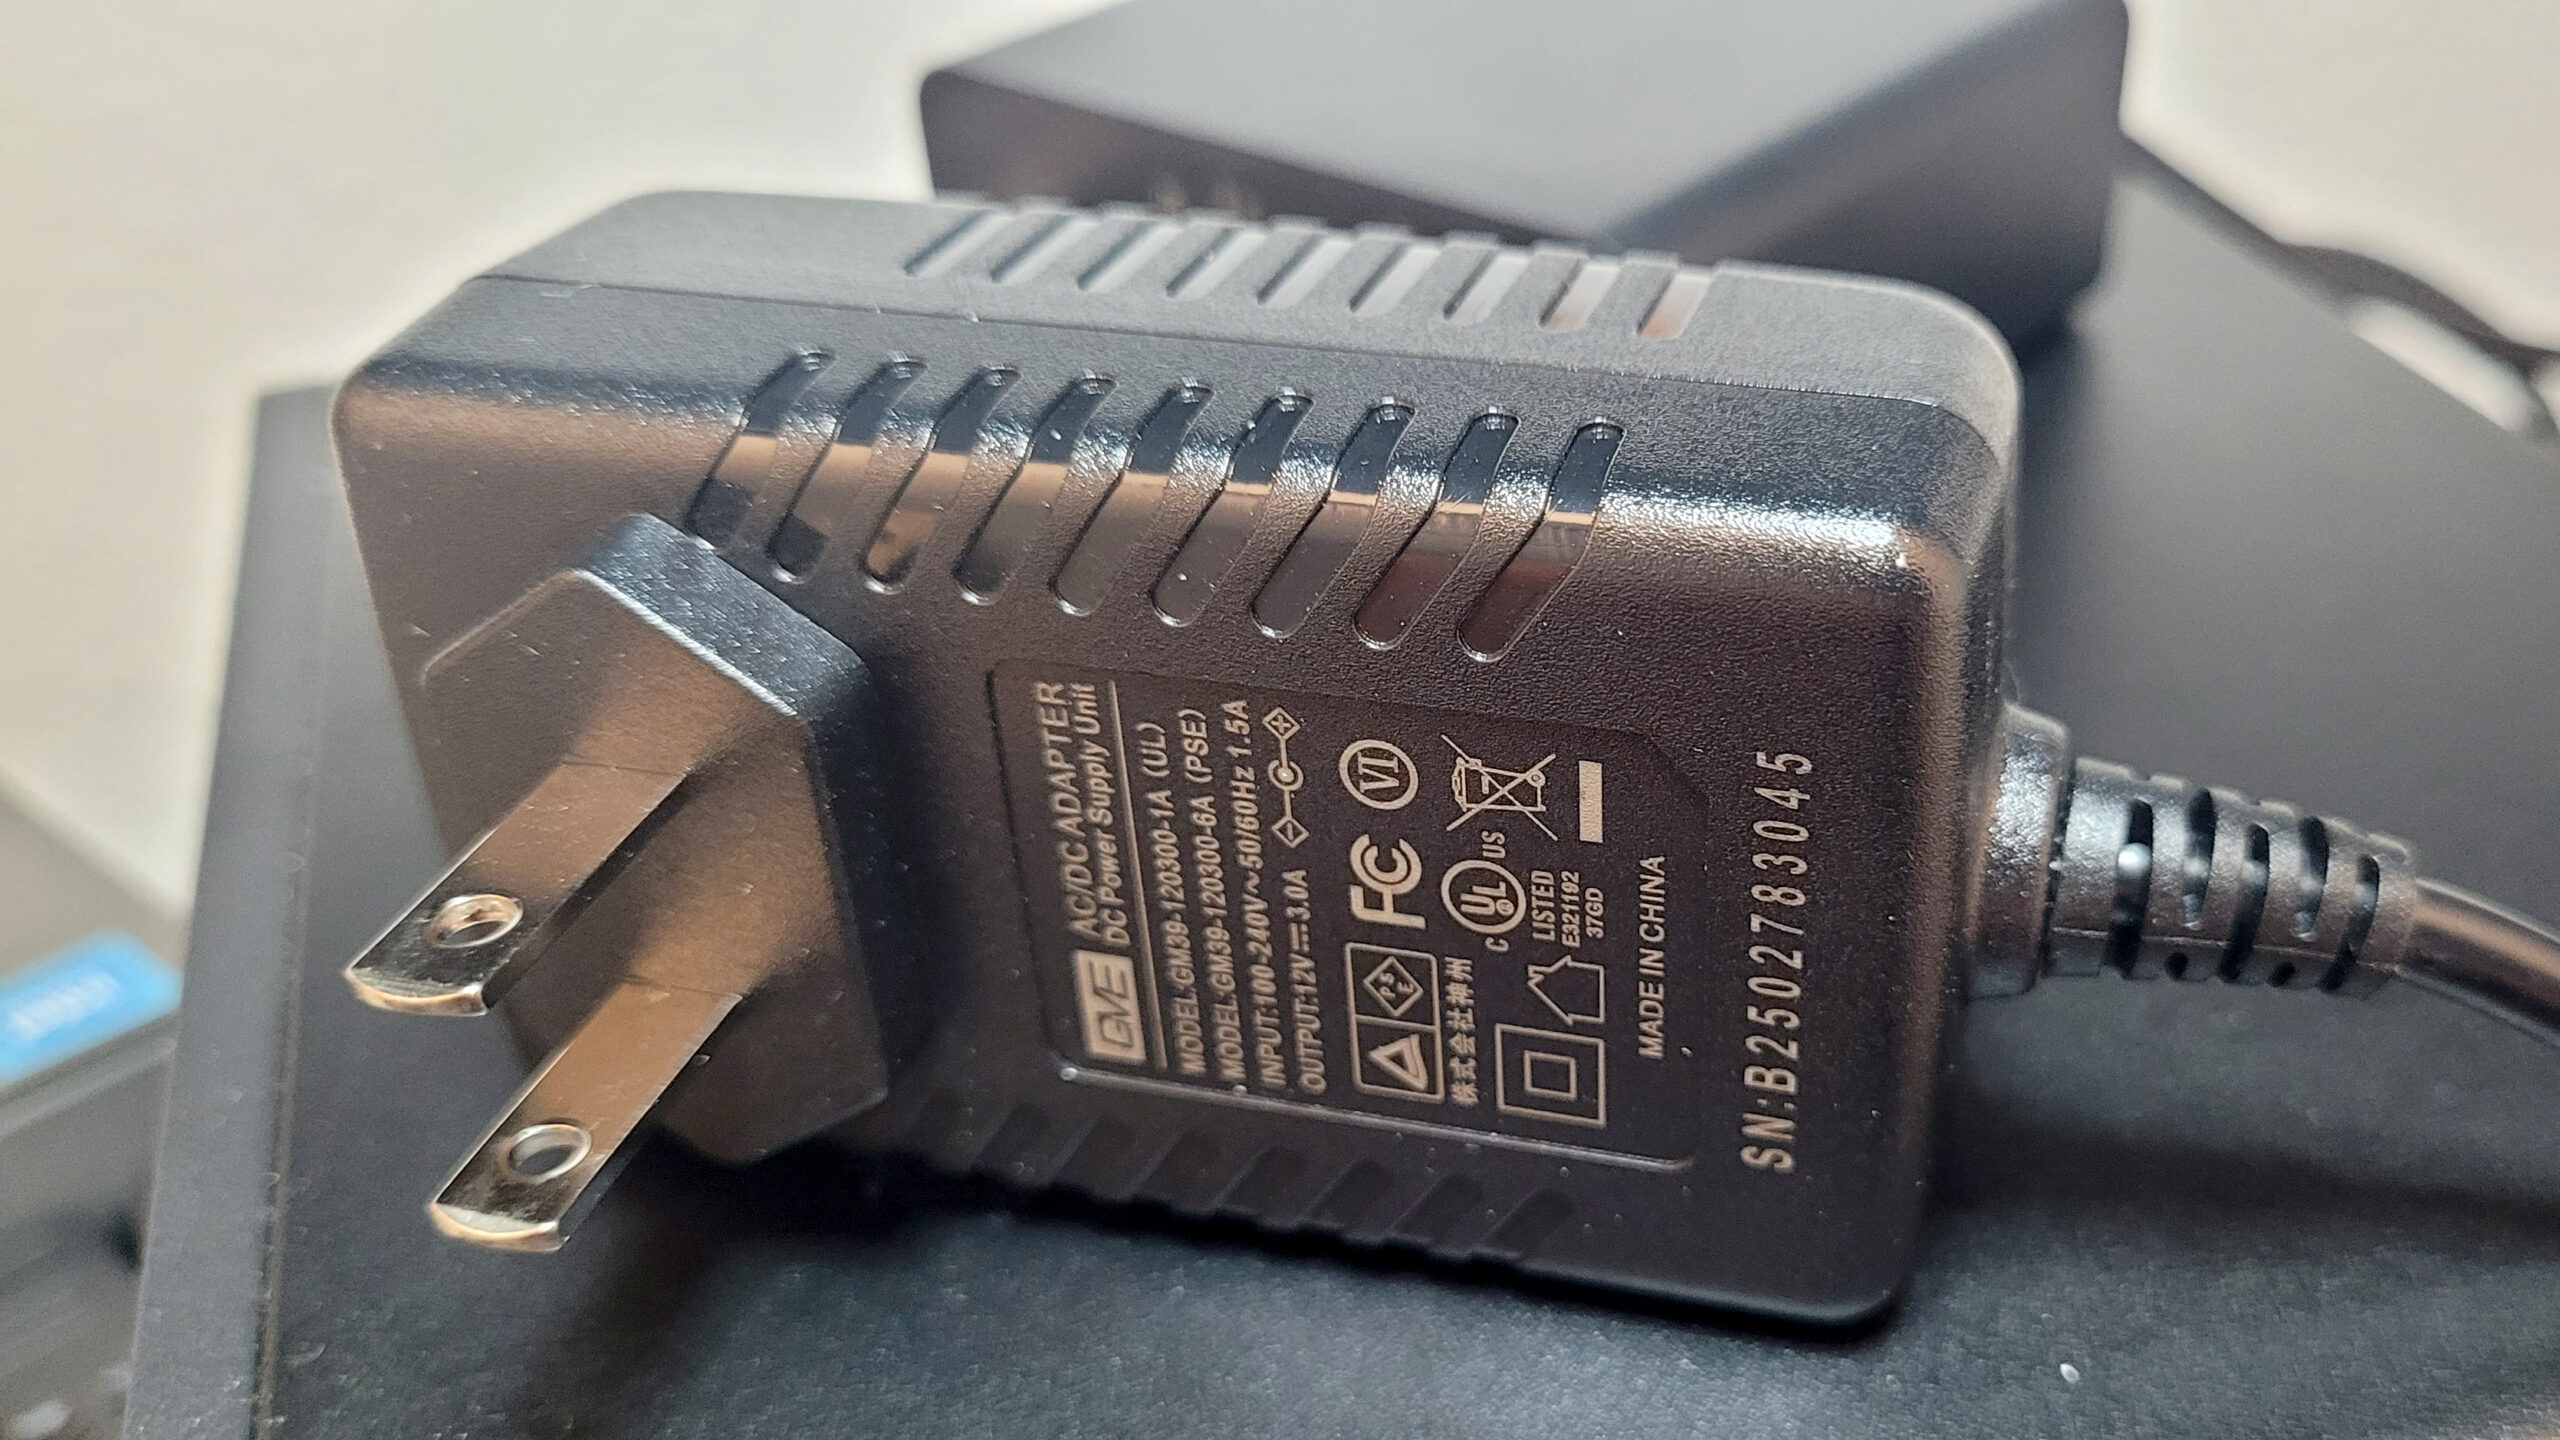
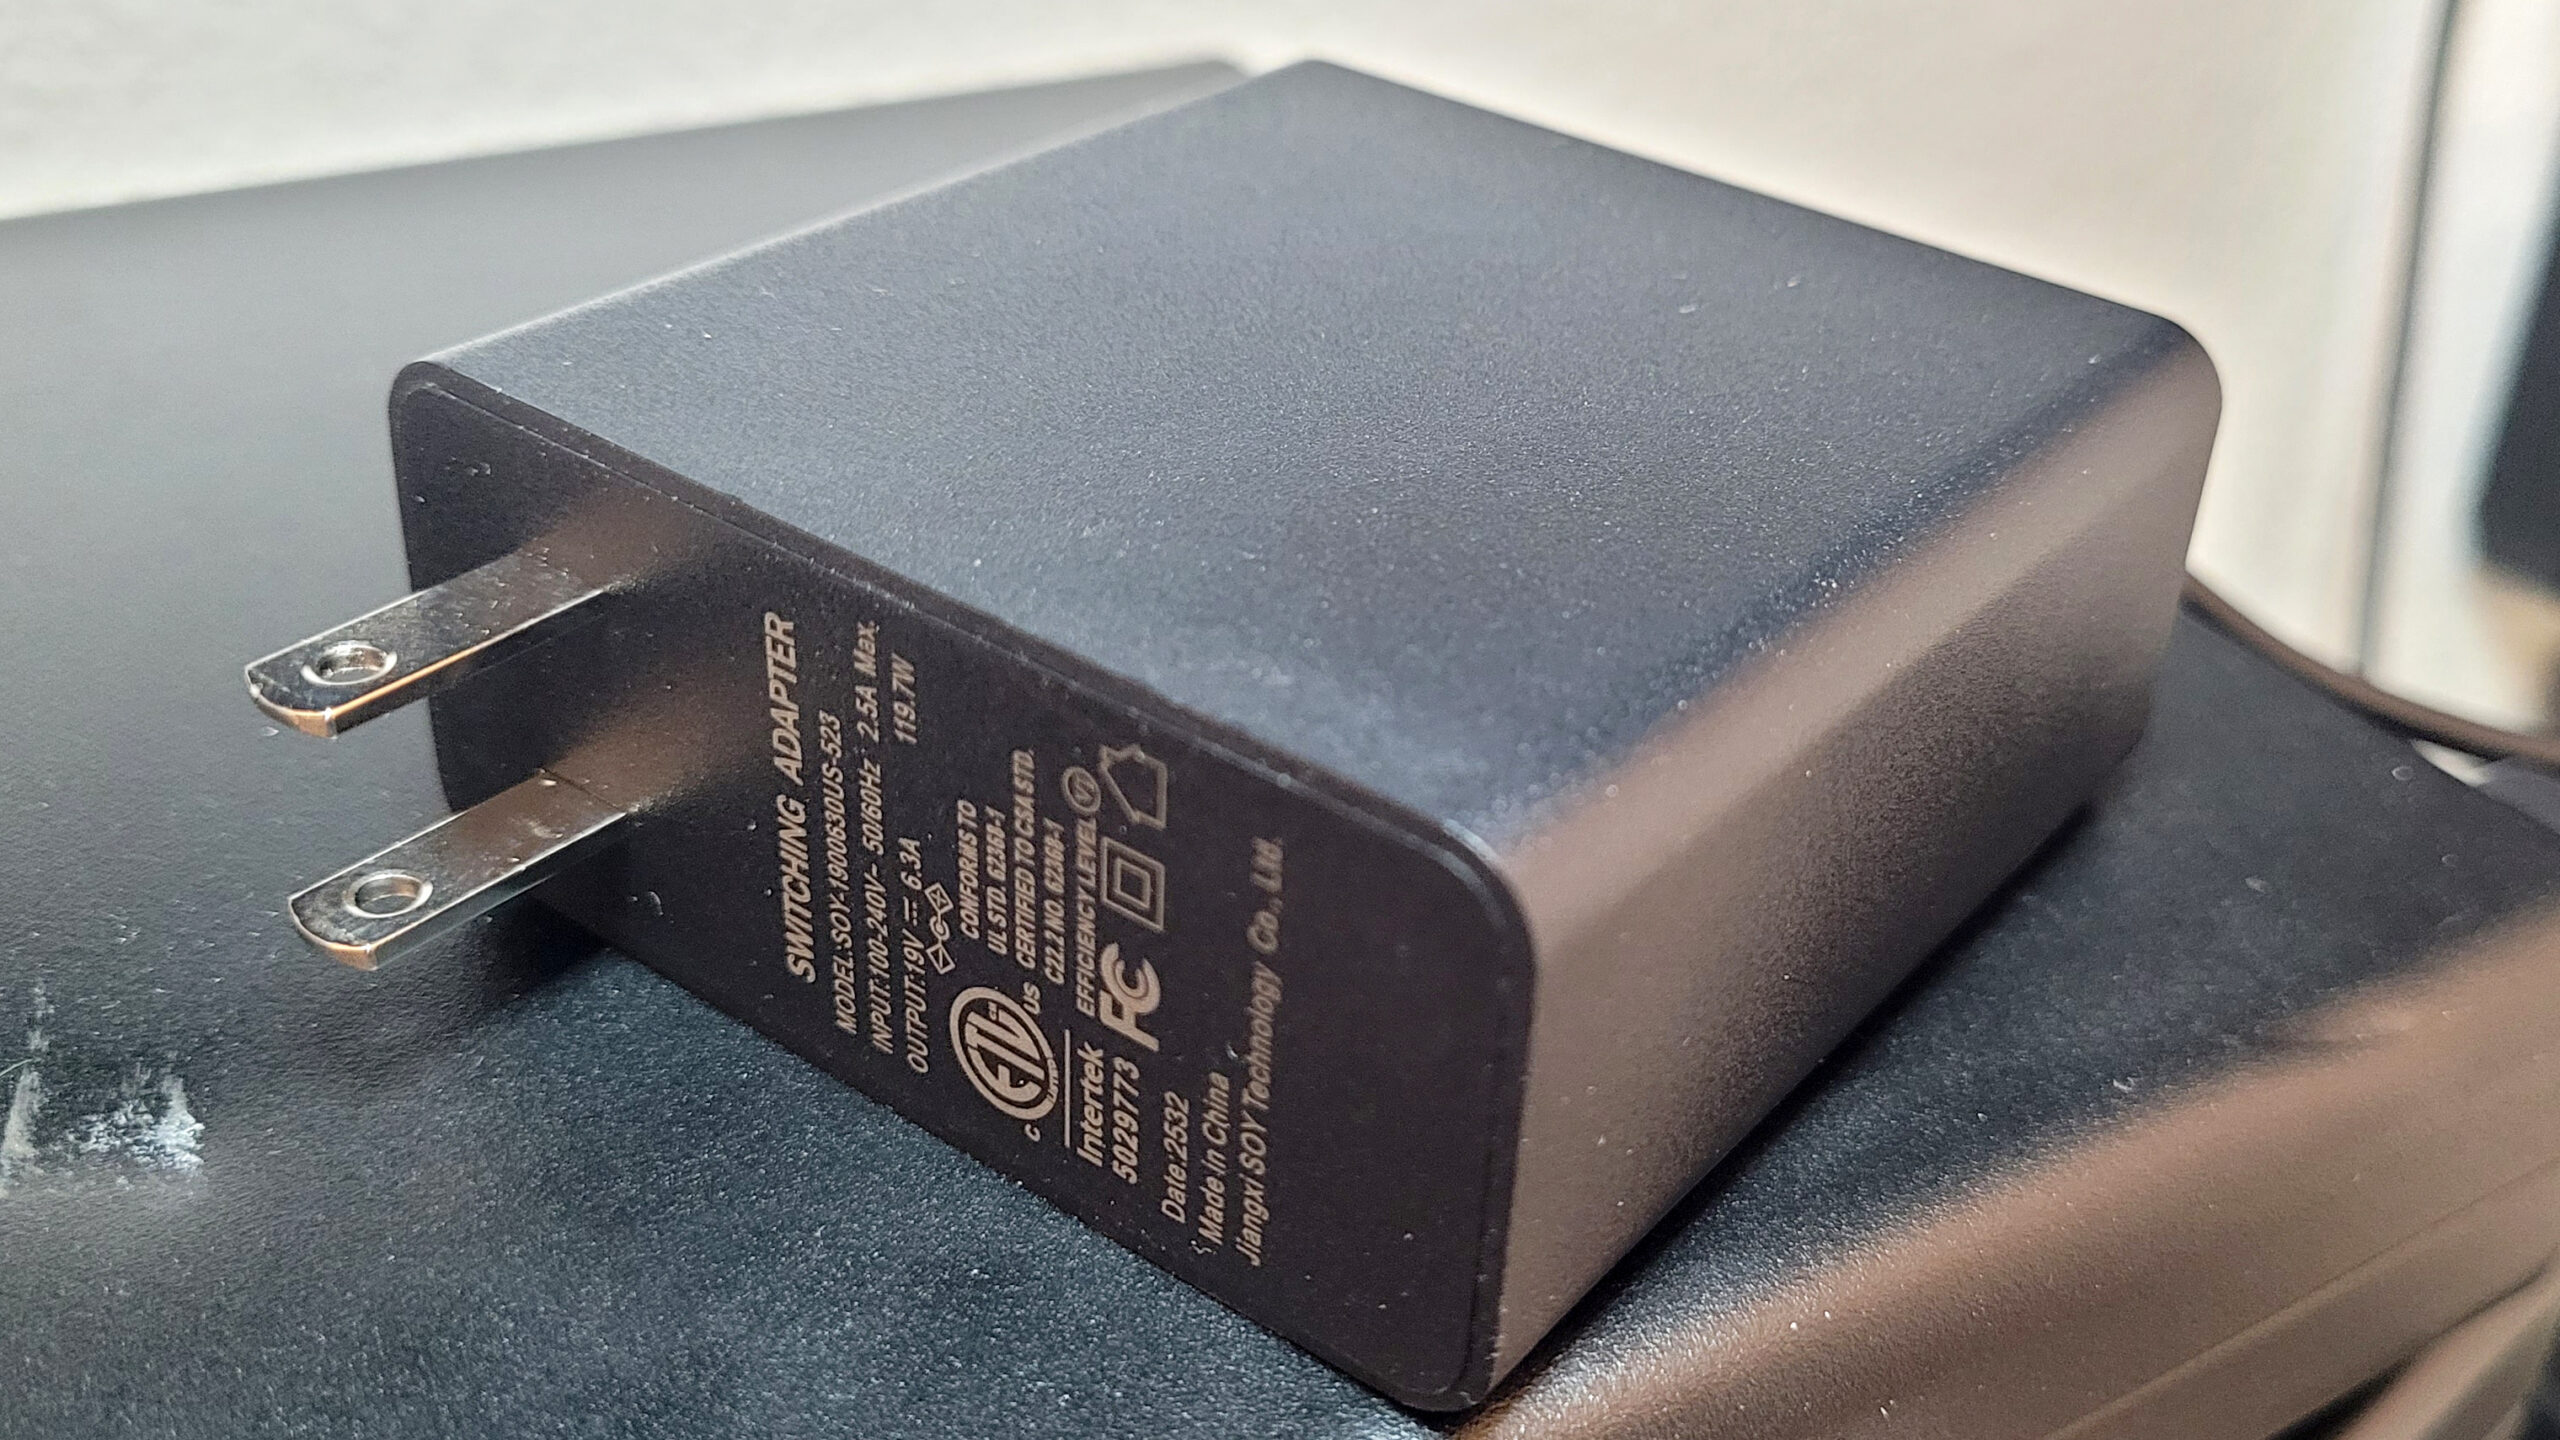
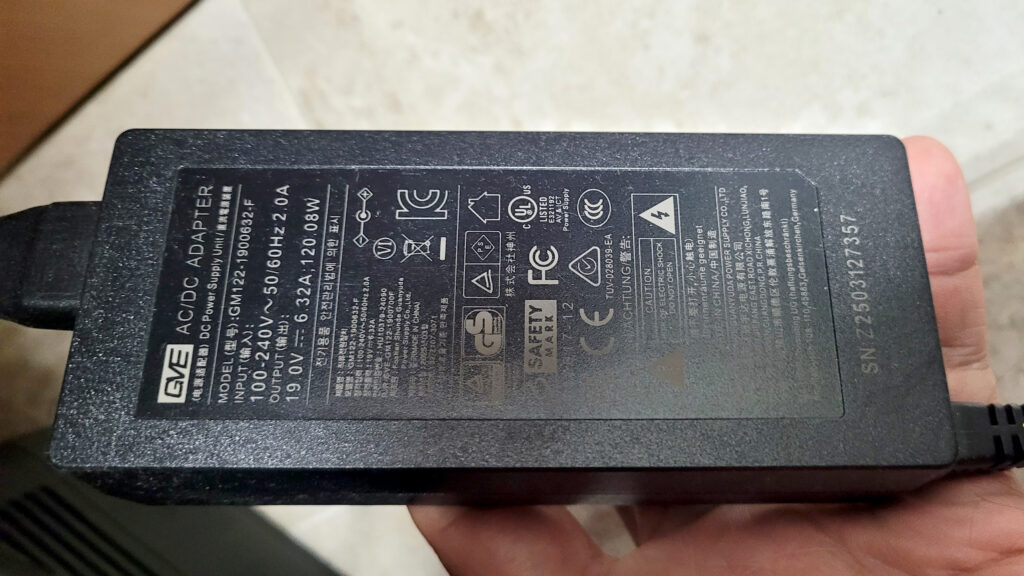
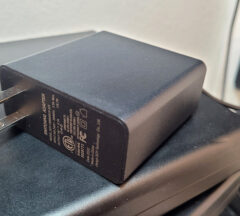
Finally, we have to quickly talk about the power supplies. The smaller Mini PCs such as the NucBox G5 Minis use a 12V Power supply, while the rest use 19V with amps ranging from 3A to 6.32A for the more powerful. These are external power adapters with a barrel connector, but all of them are of high quality and regulated. Click to expand the images below.
Windows Licensing and Install
Make sure you read the Best Practices section below so you can avoid some problems with activating the Windows License. All of these Mini PCs come with either Windows 11 Home or Pro pre-installed. As soon as the PC goes online, Windows pulls the key from your motherboard’s BIOS and activates itself. When reinstalling Windows, most drivers can be found online in the Support websites – in going through the process I wrote multiple articles for finding all Drivers for certain Mini PCs that were not installed by Windows updates:
1) Missing Drivers for Beelink SER 5 Max
2) Minisforum UM890 Pro Missing Drivers
3) GMKTec NuxBox K10 Missing Drivers
4) Drivers for GMKTec Ryzen Mini PCs
All of the PCs were great at detecting either USB Flash Drives, External USB Drives and even USB/NVMe drive enclosures on any available USB Port (3.x or USB-C) – I use Ventoy for my installs but you can also use sysprep and your favorite imaging tool, and they also support PXE Boot.
Solving Windows Activation Issues
Once you login and connect the Mini PC to the Internet, make sure to check your Windows activation. If activation was not successful, you have two methods for solving this problem.
1) Phone Activation (I only used this once)
2) Removing the Windows key from the registry – This has been my go to. Since these PCs come with License Keys embedded in the BIOS, during setup it’s possible there was an attempt to activate with an OEM key, so this key needs to be removed, and then Windows will pull the correct key.
To uninstall the key, open CMD or PowerShell as an Administrator, and run the following:
Uninstall Product Key
slmgr /upkRemove Windows Product Key from Registry
slmgr /cpkyRestart the PC and make sure it is connected to the Internet. Within a few minutes a new activation will be attempted with the proper key. If this does not work and the activation problem does not solve itself within 30 minutes, re-try steps above one more time, making sure to restart after you remove the key. If activation does not work, contact support which will provide you with an activation key. Once provided, run the steps above again, then install the new product key with the following command (replace 12345 product key below with the key supplied:
slmgr /ipk 12345-12345-12345-12345-12345You can attempt/force an activation manually with the following command:
slmgr /atoNoise Level
I haven’t received any complaints of loud fans, but when I was benchmarking and doing many program installs the PCs would in fact increase their RPM noticeably. Before buying any PC check out the reviews – many users have posted video as well as measured dBs. Also, follow instructions carefully for ventilation. Most of these manufacturers suggest the PCs have a good clearance all around especially above and below. You may also play around with the Fan/Performance settings in the BIOS and Windows to lower the performance of the CPU, or control the Fan’s performance profile.
Support
Every single manufacturer I contacted about certain problems responded within 24 hours. Their contact information is available on their support pages – see below:
- Acemagic – Downloads – Contact Us
- Beelink – Downloads – Contact Us – Slow loading Downloads page – Bee Patient
- BOSGAME – Downloads – Contact Us
- GEEKOM – Downloads – Contact Us
- GMKtec – Downloads – Contact Us
- MINISFORUM – Downloads – Contact Us
Best Practices
I hope these Mini PCs can benefit your home, homelab, business, clients or project as well as they have mine. For this reason I will share my “best practices” tips for you to set these up with great success. In order after purchase, arrival, unboxing and powering up:
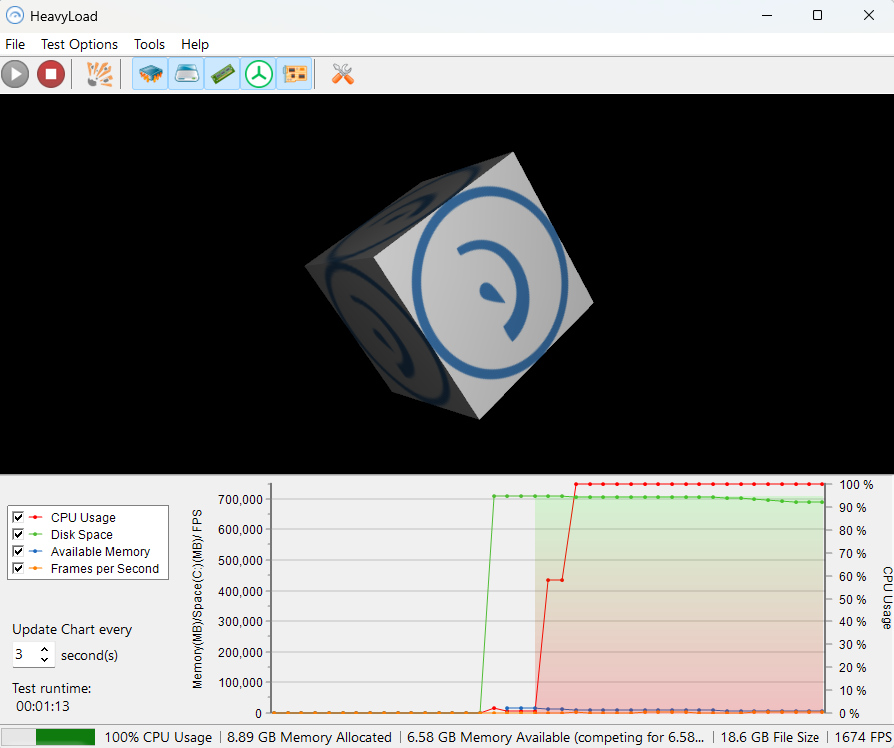
Step 1: Benchmark and Stress Test
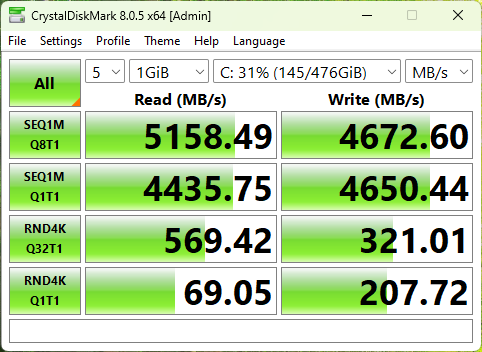
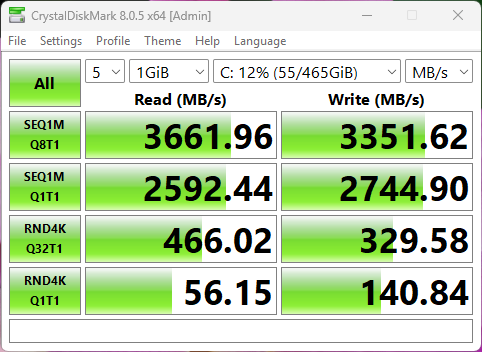
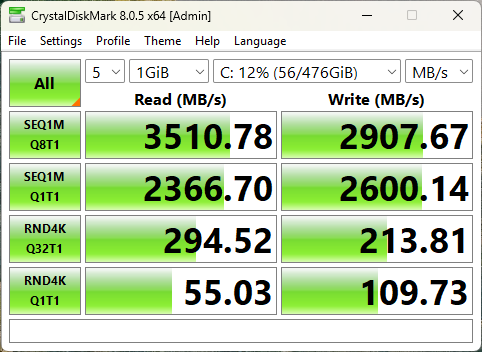
Simply put, if your PC can survive a Stress Test for at least 10 minutes, then it can survive anything. An application such as HeavyLoad, will force all the components of your Mini PC to work at full speed/load, possibly forcing them to crash if they are defective. Simultaneously, it runs your CPU at 100%, writes to your Drive, uses all free memory, makes your GPU work, and makes sure all of these processes run smoothly. In our tested 100 Mini PCs, not a single one crashed, rebooted, overheated or lost power. This test is usually performed as soon as you can so any failures can be brought to the surface immediately, before the Mini PC gets more involved in your daily use or network.
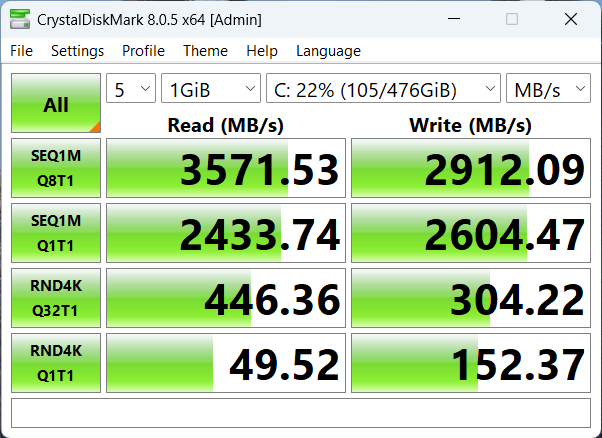
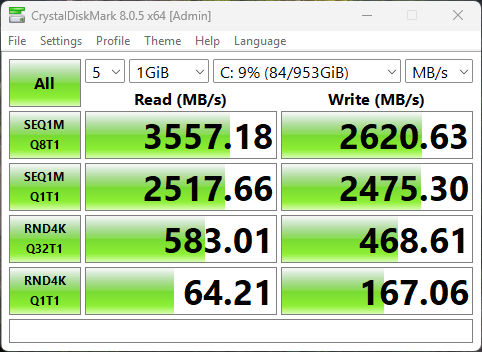
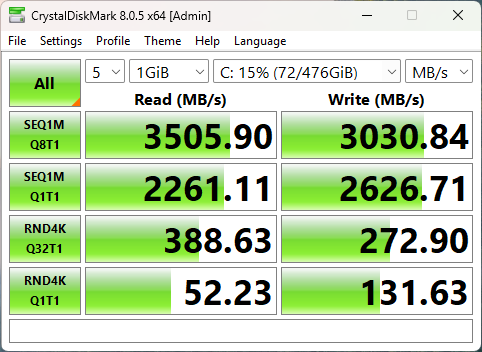
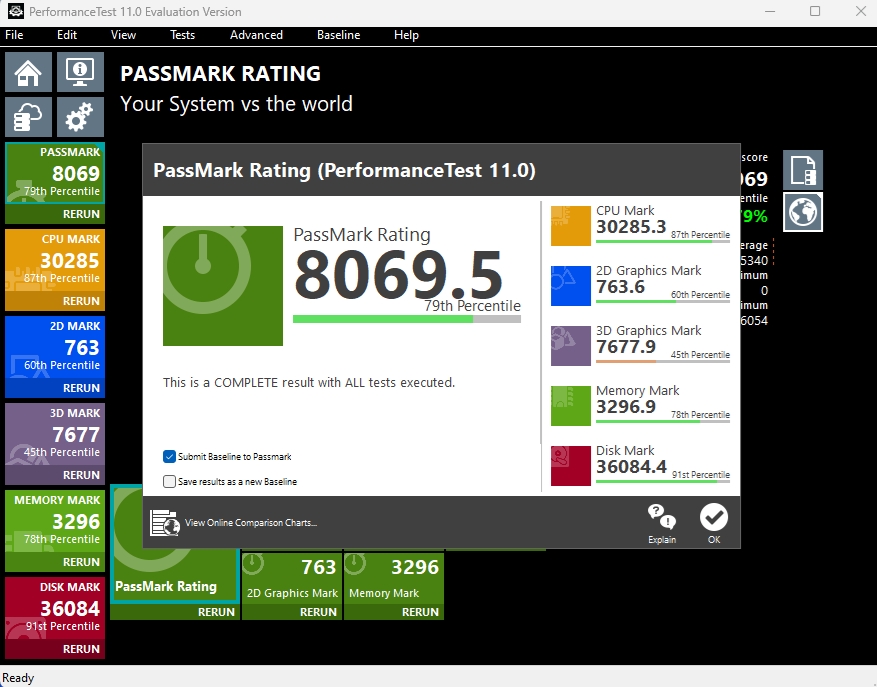
To compare performances from one Mini PC to another and also individual components, I used Passmark’s PerformanceTest. This is a great tool that benchmarks the CPU, Drive, Memory, GPU and gives you an overall score.
Step 2: Check the SSD Drive Usage
In a few Mini PCs I noticed the drive usage was excessive – that is – a lot of data had been written to the drive. After installing Windows 11, updates and all of your applications, it would be normal to see a brand new drive with around 50 GB – 80 GB of usage, but some of the over-used drives on the brand new Mini PCs ranged from 500 Gigabytes to over 35 Terabytes of data written, with thousands of times powered on and hundreds of hours of usage. The tool used to review the drive’s info was CrystalDiskInfo, and in some cases I confirmed with the manufacturer’s SSD Toolbox or Utility. Although I still have the heavily used drive in production on non-critical PCs, it’s a good idea to replace these SSDs with newer, and more popular brands such as Samsung, Crucial, Western Digital, Kingston, Patriot, SanDisk or even SiliconPower.

Step 3: Wipe and Reinstall Operating System
Even though most of these Mini PCs ship with Windows 11 Pro or Home installed at the time this article was written, these PCs are fully compatible with many Operating Systems and platforms such as Ubuntu, Linux Mint, FreePBX, TrueNAS, pfSense, etc. – They have become extremely popular at completely replacing NAS Devices. Even though I have not detected any malware, spyware, or the pre-installed OS attempting to scan my network or communicate with some random IP, it is always recommended you wipe and reload. Certain suspicious pre-installed apps and scripts have been reported in other forums, but I have not been able to verify these claims. Important: Make sure to keep your PC offline during Windows re-installation (Unplug the LAN cable).
Reinstalling the OS will give you a chance to:
- Test out the proper operation of the PC: The CPU, Memory, USB media and internal SSD Drive need to work together to install the OS. Any failure here may point to a hardware problem that needs to be diagnosed further.
- Test out the USB ports with Bootable media
- Start out with the Latest OS by performing a fresh download. The more service packs are integrated into the OS, the less bloated it will be during use. Also, pre-installed applications (bloatware) can slow down your PC. Even if uninstalled these may leave files and tons of entries in the registry.
- Install the latest Drivers. The pre-installed OS may have older drivers – these are usually installed when shipped from factory and many updates are usually released since then.
- Prevent Malware – As I mentioned, I have not experienced this, but it’s not unusual to receive a used product from Amazon which may contain installed malware by the previous user. It’s better to be safe than sorry.
Step 4: Check the BIOS and install any Updates
I sincerely believe in “If it ain’t broke, don’t fix it” – But in this case, I recommend you find out the BIOS version of your Mini PC, check the support page, and review the Readme file on the latest version. Some BIOS updates are necessary for security updates, future-proofing, bug fixes and increased compatibility. I wrote a whole article about the Best Practices for BIOS & Firmware updates here. If you are unable to find any BIOS downloads in the support website, make sure to contact support and provide them the Serial number, purchase information and current BIOS date.
Step 5: Update the Drivers and Software
As I mentioned above, newer hardware may not always have it’s drivers available in the Windows Update Catalog or already integrated into the OS. So you may have to visit the Support Page to download the Drivers, or the manufacturer’s page of the device. Some of these may include the AMD Chipset Software, Adrenalin Edition Application, Intel Chipset Drivers/Software, individual Drivers for Realtek LAN Devices, Intel Wi-Fi 6 AX Cards, Mediatek, Senary, and others.
Step 6: Placement, Cleanup and Maintenance
These Mini PCs have multiple fans in a very small enclosure, which makes them very effective. Please make sure to:
- Follow manufacturer’s instructions on desk/monitor placement; do not block vents, top or bottom fans, place heavy objects on top, or mount incorrectly.
- Keep an eye on the dust and perform cleanup of all fans as required – This is my go to Blower
- Check fans regularly and make sure they are operational
- Immediately replace any failing fans – Contact support – If under warranty they will send you new fans for free, but there is always the option to purchase them or purchase extra.
If you are facing a problem or have any questions about this article, please contact me.


