Lenovo BIOS Update – Child process failed. Return code: 16 – Solved
- Home
- Solution
- Technology Consulting
- Lenovo BIOS Update – Child process failed. Return code: 16 – Solved

There are still many older computers out there that will work just fine with Windows 11, but some drivers or updates may fail to run properly on the latest versions of Windows 11, such as 25H2. Recently, I updated the BIOS for a bunch of Lenovo M710e workstations, with 16 GB of RAM, an M.2 SSD Drive and a Intel core i5-7400 – which is officially not supported by Windows 11 – but this PC boots up in seconds and will run many applications without slowing down. The error shown above occurred as I tried to update an ideacentre 300S-08IHH – The BIOS download includes older files and drivers, and upon attempting to update the BIOS using the Windows application, the following error appears:
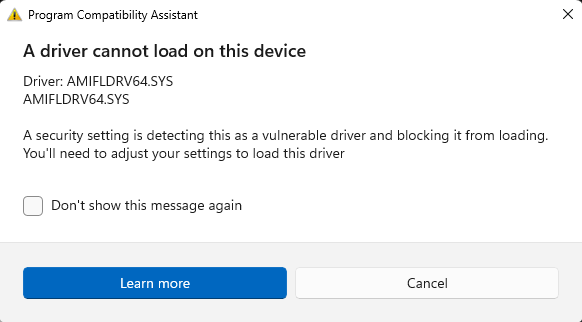
A driver cannot load on this device
Driver: AMIFLDRV64.SYS
A security setting is detecting this as a vulnerable driver and blocking it from loading. You'll need to adjust your setting to load this driver.
In the CMD Window, the error displayed is:
10 - Error: Unable to load Driver
Child process failed. Return Code: 16
You could disable Driver Signature Enforcement in the advanced Startup settings menu when starting the Windows boot troubleshooting Menu…but this will not solve the problem. You could also try installing Windows 7, 8, or 10, but that will be a lot of work – there is a simpler solution:
Note: Proceed with caution. This trick worked for me successfully on several of the Lenovo ideacentre 300S-08IHH workstations. If you would like to better understand and review the best practices for BIOS, UEFI and Firmware updates, please read my article here. This should also work for other models as the utility that performs the update is the same for many Lenovo workstations and Laptops.
1. The Solution is to download an updated bios flash utility compatible with Windows 11 (or future versions) but use it instead to load the BIOS file for the older PC your are working on. I will walk you through it step by step. First, I am working with two PCs (as an example):
i) Lenovo ThinkCentre M710e – Latest BIOS Update utility/file is from 2024
ii) Lenovo ideacentre 300S-08IHH – Latest BIOS Update utility/file is from 2018 (incompatible with Windows 11)
The M710e’s utility includes newer files and works well with Windows 11, so I will use this utility to update the older PC.
2. Download the BIOS update utilities/programs for both workstations:
a) M710e
b) 300s-08IHH
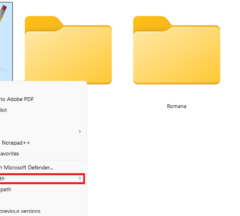
You will end up with two files like the following:

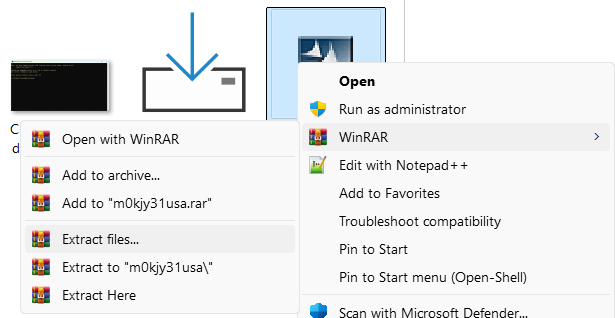
3. Extract the content of the files. Older utilities will extract the files and attempt to perform the BIOS update (be careful and just make sure to cancel the update) – Newer ones will give you the option to Update or Extract only. If you already tried to update the BIOS and failed, then the utility already extracted the files to C:\SWTOOLS. To play it safe, I highly recommend you use a utility like Universal Extractor, WinRAR, or 7-zip to extract each archive to its own directory.

Default Extraction Path: C:\SWTOOLS\FLASH\M1ZJY43USA
You will end up with two folders and different files, here are the two separate folders with the BIOS files highlighted:
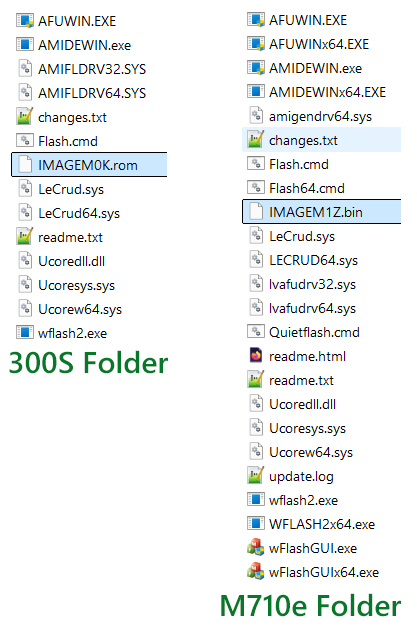
4. Copy the IMAGEM0K.rom from the 300s folder to the M710e folder where the newer utilities are. If we look at both folders, we can see a wflash2.exe file in both of them. The utility is the same, but the older Flash utility in the 300s folder used the wflash2.exe to perform the BIOS update, instead of the newer wFLASHGUIx64.exe utility in the newer version in the M710e folder. Analyzing the Flash.cmd batch file in the 300s folder, we see the following line:
wflash2.exe imageM0K.rom %1 /bb /rsmb5. Flash the BIOS with the newer version of wflash2.exe. With the sample IMAGEM0K.rom in the M710e folder, we can now proceed to update the BIOS by running the following command in CMD (or PowerShell). Make sure to change the directory to the M710e folder, and run the following command:
wflash2.exe imageM0K.rom /bb /rsmbOnce you press Enter – the wflash2.exe application will start to update the BIOS and show you a “Completed” message when done. Proceed to restart your PC. Jump to step 6 if you come across any errors.
Note: If you would like to see all of the parameters/switches available for the wflash2.exe utility, then just type wflash2.exe /? – it will give you the version of the Firmware Update Utility, as well as the list of arguments (this can help you compare versions between the two folders):
Lenovo Firmware Update Utility 4.5.6
(C) Copyright 1984-2015, Lenovo Group. All Rights Reserved.

Arguments:
/rsmb Preserve all SMBIOS structures
/clr Clear BIOS settings
/ign Ignore BIOS version check
/mtm:nnnnnnn Update system Machine Type and Model
/sn:nnnnnnn Update system Serial Number
/csn:nnnnnnn Update Chassis Serial Number
/tag:nnnnnnn Update Asset Tag
/uuid Generate and update system UUID
/logo: Change logo
/quiet Operating without physical presence
/reboot Reboot after all requests done
/pass:nnnnnnn Input current system password
6. Optional: Load Optimized Defaults – Once you restart the PC after the update, if you see any errors come up, Enter the BIOS and load Optimal or OS Optimal Defaults. In my case it was under the Exit Menu. I saved the settings, restarted, and all errors were gone. I then confirmed the BIOS had successfully updated from a 2015 version to a 2018 – You can see this on the info page in the BIOS or running msinfo32 utility in Windows.